NIO概念
概念:non-blocking io 即非阻塞的IO
三大组件
Channel与Buffer
channel类似与stream,是读写数据的双向通道,可以从channel读取数据到buffer,也可以将buffer的数据读取到channel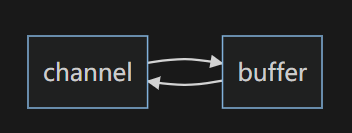
常见的channe
- FileChannel:文件传输
- DatagramChannel:UDP网络编程传输对象
- SocketChannel:TCP网络编程传输对象(客户端+服务器端)
- ServerSocketChannel(服务器端)
buffer用来缓冲读写数据
常见的buffer有
- ByteBuffer
- MappedByteBuffer
- DirectByteBuffer
- HeapByteBuffer
- ShortBuffer
- IntBuffer
- LongBuffer
- FloatBuffer
- DoubleBuffer
- CharBuffer
Selector
多线程版设计
一个客户端表现为一个socket,当有多个socket则开启多个连接,当连接数过多时内存消耗严重

缺点:内存占用高,线程上下文切换版本高,只适合连接数较少的情况
线程池版设计
在阻塞状态下,如果线程处理了一个socket,那么就不能处理另外一个socket,只有等到当前socket断开后,才能处理另外一个
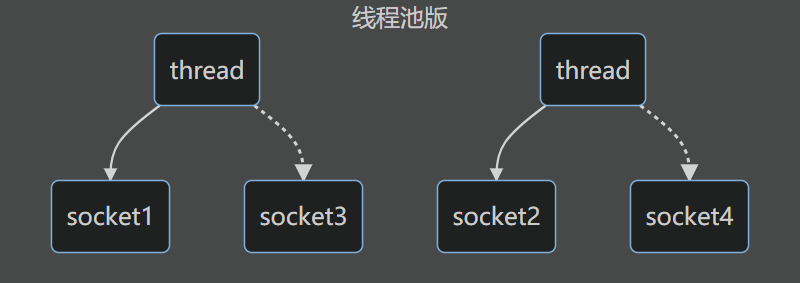
缺点:阻塞模式下,线程只能处理一个socket连接,仅适用于短连接场景
Selector版设计
selector 的作用就是配合一个线程来管理多个 channel,获取这些 channel 上发生的事件。
channel 工作在非阻塞模式下,不会让线程只挂在一个 channel 上(提升了线程的利用率)适合连接数特别多,但流量低的场景(low traffic)
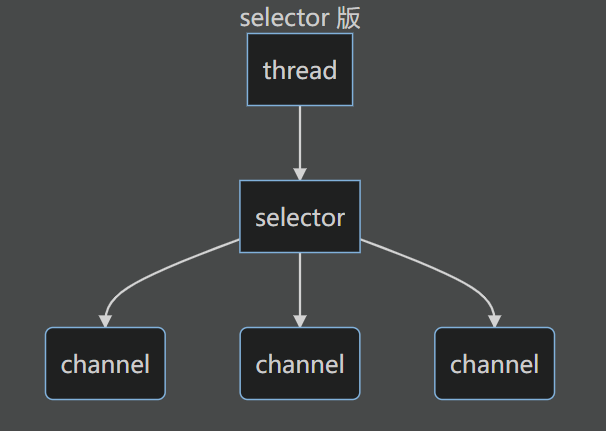
若事件未就绪,调用 selector 的 select() 方法会阻塞线程,直到 channel 发生了就绪事件。这些事件就绪后,select 方法就会返回这些事件交给 thread 来处理
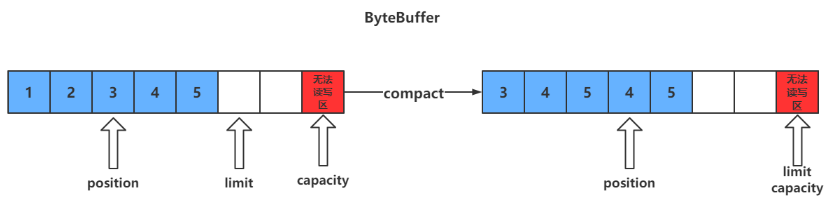
ByteBuffer
使用方式
向 buffer 写入数据:例如调用 channel.read(buffer)
调用 flip() 切换至读模式
- flip会使得buffer中的limit变为position,position变为0
- 从 buffer 读取数据,例如调用 buffer.get()
调用 clear() 或者compact()切换至写模式
- 调用clear()方法时position=0,limit变为capacity
- 调用compact()方法时,会将缓冲区中的未读数据压缩到缓冲区前面
- 重复以上步骤
使用ByteBuffer读取文件中的内容
1
2
3
4
5
6
7
8
9
10
11
12
13
14
15
16
17
18
19
20
21
22
| public static void main(String[] args) {
try (FileChannel channel = new FileInputStream("data.txt").getChannel()) {
while (true) {
ByteBuffer buffer = ByteBuffer.allocate(10);
int len = channel.read(buffer);
if (len == -1) {
break;
}
buffer.flip();
while (buffer.hasRemaining()){
byte b = buffer.get();
System.out.println((char) b);
}
}
} catch (IOException e) {
}
}
|
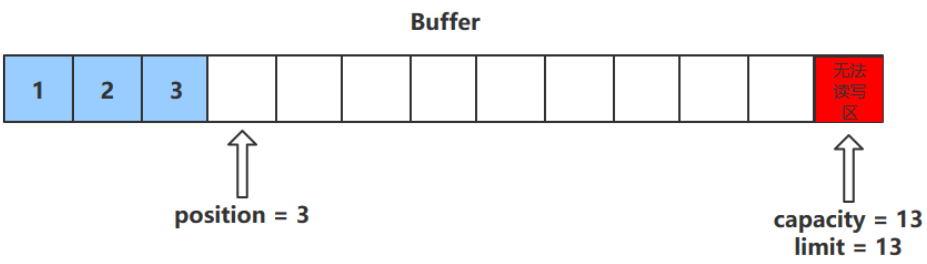
核心属性
字节缓冲区的父类Buffer中有几个核心属性
1
2
3
4
5
|
private int mark = -1;
private int position = 0;
private int limit;
private int capacity;
|
capacity:缓冲区的容量。通过构造函数赋予,一旦设置,无法更改
limit:缓冲区的界限。位于limit 后的数据不可读写。缓冲区的限制不能为负,并且不能大于其容量
position:下一个读写位置的索引(类似PC)缓冲区的位置不能为负,并且不能大于limit
mark:记录当前position的值position被改变后,可以通过调用reset() 方法恢复到mark的位置。
以上四个属性必须满足:mark <= position <= limit <= capacity
核心方法
put()方法
put()方法可以将一个数据放入到缓冲区中。
进行该操作后,postition的值会+1,指向下一个可以放入的位置。capacity = limit ,为缓冲区容量的值。
flip()方法
flip()方法会切换对缓冲区的操作模式,由写->读 / 读->写
进行该操作后
- 如果是写模式->读模式,position = 0 , limit 指向最后一个元素的下一个位置,capacity不变
- 如果是读->写,则恢复为put()方法中的值(即position为当前元素的下一个值,limit = capacity)
get()方法
get()方法会读取缓冲区中的一个值
进行该操作后,position会+1,如果超过了limit则会抛出异常
注意:get(i)方法不会改变position的值
rewind()方法
该方法只能在读模式下使用
rewind()方法后,会恢复position、limit和capacity的值,变为进行get()前的值(即position为当前元素的下一个值,limit = capacity)
clean()方法
clean()方法会将缓冲区中的各个属性恢复为最初的状态,position = 0, capacity = limit
此时缓冲区的数据依然存在,处于“被遗忘”状态,下次进行写操作时会覆盖这些数据
mark()和reset()方法
mark()方法会做一个标记,将postion的值保存到mark属性中
reset()方法会将position的值改为mark中保存的值
compact()方法
注意:此方法为ByteBuffer的方法,而不是Buffer的方法
compact会把未读完的数据向前压缩,然后切换到写模式
数据前移后,原位置的值并未清零,写时会覆盖之前的值
clear() 与 compact()
clear只是对position、limit、mark进行重置,而compact在对position进行设置,以及limit、mark进行重置的同时,还涉及到数据在内存中拷贝(会调用arraycopy)所以compact比clear更耗性能
注意:compact能保存你未读取的数据,将新数据追加到为读取的数据之后;而clear则不行,若你调用了clear,则未读取的数据就无法再读取到了
字符串和 ByteBuffer 互转
方法一
编码:字符串调用getByte方法获得byte数组,将byte数组放入ByteBuffer中(注意:在结束时处于写模式)
解码:先调用ByteBuffer的flip方法,然后通过StandardCharsets的decode方法解码
1
2
3
4
5
6
7
8
9
| public static void main(String[] args) {
ByteBuffer buffer1 = ByteBuffer.allocate(16);
buffer1.put("hello".getBytes());
buffer1.flip();
StandardCharsets.UTF_8.decode(buffer1);
}
|
方法二
编码:通过StandardCharsets的encode方法获得ByteBuffer(注意:此时获得的ByteBuffer为读模式,无需通过flip切换模式)
解码:通过StandardCharsets的decode方法解码
1
2
3
4
5
6
7
| public static void main(String[] args) {
ByteBuffer buffer2 = StandardCharsets.UTF_8.encode("hello");
String str = StandardCharsets.UTF_8.decode(buffer2).toString();
StandardCharsets.UTF_8.decode(buffer2);
}
|
方法三
编码:字符串调用getByte()方法获得字节数组,将字节数组传给ByteBuffer的wrap()方法,通过该方法获得ByteBuffer(注意:此时获得的ByteBuffer为读模式,无需通过flip切换模式)
解码:通过StandardCharsets的decode方法解码
1
2
3
4
5
6
| public static void main(String[] args) {
ByteBuffer buffer3 = ByteBuffer.wrap("hello".getBytes());
StandardCharsets.UTF_8.decode(buffer3);
}
|
粘包与半包
现象
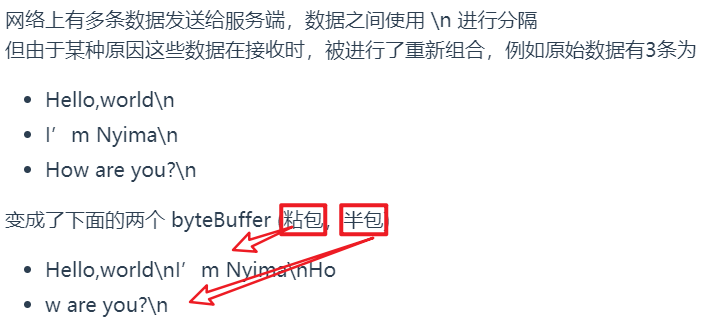
粘包出现原因
发送方在发送数据时,并不是一条一条地发送数据,而是将数据整合在一起,当数据达到一定的数量后再一起发送。这就会导致多条信息被放在一个缓冲区中被一起发送出去
半包出现原因
接收方的缓冲区的大小是有限的,当接收方的缓冲区满了以后,就需要将信息截断,等缓冲区空了以后再继续放入数据。这就会发生一段完整的数据最后被截断的现象
解决方法
1
2
3
4
5
6
7
8
9
10
11
12
13
14
15
16
17
18
19
20
21
22
23
24
25
26
27
28
29
30
31
32
33
34
| public class ByteBufferDemo {
public static void main(String[] args) {
ByteBuffer buffer = ByteBuffer.allocate(32);
buffer.put("Hello,world\nI'm Nyima\nHo".getBytes());
split(buffer);
buffer.put("w are you?\n".getBytes());
split(buffer);
}
private static void split(ByteBuffer buffer) {
buffer.flip();
for(int i = 0; i < buffer.limit(); i++) {
if (buffer.get(i) == '\n') {
int length = i+1-buffer.position();
ByteBuffer target = ByteBuffer.allocate(length);
for(int j = 0; j < length; j++) {
target.put(buffer.get());
}
ByteBufferUtil.debugAll(target);
}
}
buffer.compact();
}
}
|
文件编程(*)
FileChannel
工作模式:FileChannel只能在阻塞模式下工作,所以无法搭配Selector
获取
不能直接打开 FileChannel,必须通过 FileInputStream、FileOutputStream 或者 RandomAccessFile 来获取 FileChannel,它们都有 getChannel 方法
- 通过 FileInputStream 获取的 channel 只能读
- 通过 FileOutputStream 获取的 channel 只能写
- 通过 RandomAccessFile 是否能读写根据构造 RandomAccessFile 时的读写模式决定
读取
通过 FileInputStream 获取channel,通过read方法将数据写入到ByteBuffer中
read方法的返回值表示读到了多少字节,若读到了文件末尾则返回-1
1
| int readBytes = channel.read(buffer);
|
可根据返回值判断是否读取完毕
1
2
3
4
| while(channel.read(buffer) > 0) {
...
}
|
写入
因为channel也是有大小的,所以 write 方法并不能保证一次将 buffer 中的内容全部写入 channel。必须需要按照以下规则进行写入
1
2
3
4
|
while(buffer.hasRemaining()) {
channel.write(buffer);
}
|
关闭
通道需要close,一般情况通过try-with-resource进行关闭,最好使用以下方法获取strea以及channel,避免某些原因使得资源未被关闭
1
2
3
4
5
6
7
8
9
10
11
12
13
| public class TestChannel {
public static void main(String[] args) throws IOException {
try (FileInputStream fis = new FileInputStream("stu.txt");
FileOutputStream fos = new FileOutputStream("student.txt");
FileChannel inputChannel = fis.getChannel();
FileChannel outputChannel = fos.getChannel()) {
// 执行对应操作
...
}
}
}Copy
|
位置
channel也拥有一个保存读取数据位置的属性,即position
1
| long pos = channel.position();Copy
|
可以通过position(int pos)设置channel中position的值
1
2
| long newPos = ...;
channel.position(newPos);Copy
|
设置当前位置时,如果设置为文件的末尾
- 这时读取会返回 -1
- 这时写入,会追加内容,但要注意如果 position 超过了文件末尾,再写入时在新内容和原末尾之间会有空洞(00)
强制写入
操作系统出于性能的考虑,会将数据缓存,不是立刻写入磁盘,而是等到缓存满了以后将所有数据一次性的写入磁盘。可以调用 force(true) 方法将文件内容和元数据(文件的权限等信息)立刻写入磁盘
transferTo方法
使用transferTo方法可以快速、高效地将一个channel中的数据传输到另一个channel中,但 一次只能传输2G的内容 。transferTo底层使用了零拷贝技术
1
2
3
4
5
6
7
8
9
10
11
12
13
14
15
| public class TestChannel {
public static void main(String[] args){
try (FileInputStream fis = new FileInputStream("stu.txt");
FileOutputStream fos = new FileOutputStream("student.txt");
FileChannel inputChannel = fis.getChannel();
FileChannel outputChannel = fos.getChannel()) {
inputChannel.transferTo(0, inputChannel.size(), outputChannel);
} catch (IOException e) {
e.printStackTrace();
}
}
}
|
当传输的文件 大于2G 时,需要使用以下方法进行多次传输
1
2
3
4
5
6
7
8
9
10
11
12
13
14
15
16
17
18
| public class TestChannel {
public static void main(String[] args){
try (FileInputStream fis = new FileInputStream("stu.txt");
FileOutputStream fos = new FileOutputStream("student.txt");
FileChannel inputChannel = fis.getChannel();
FileChannel outputChannel = fos.getChannel()) {
long size = inputChannel.size();
long capacity = inputChannel.size();
while (capacity > 0) {
capacity -= inputChannel.transferTo(size-capacity, capacity, outputChannel);
}
} catch (IOException e) {
e.printStackTrace();
}
}
}
|
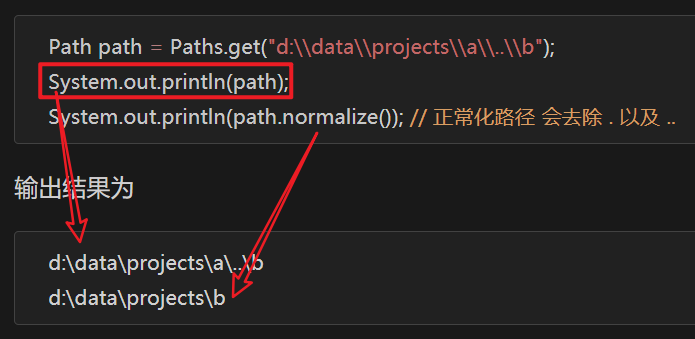
Path
jdk7引入了 Path 和 Paths 类(Path用来表示文件路径,Paths是工具类,用来获取 Path 实例)
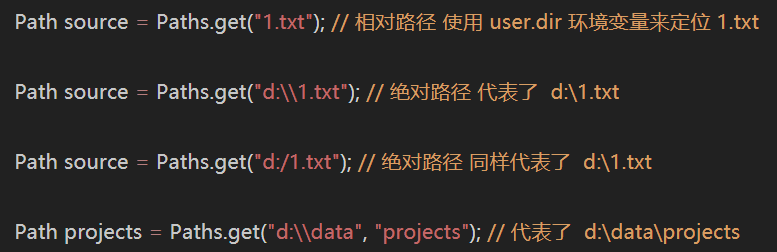
例如目录结构如下
1
2
3
4
5
| d:
|- data
|- projects
|- a
|- b
|
Files
检查文件是否存在
1
2
| Path path = Paths.get("helloword/data.txt");
System.out.println(Files.exists(path));
|
创建一级目录
注意:
如果目录已存在,会抛异常 FileAlreadyExistsException
不能一次创建多级目录,否则会抛异常 NoSuchFileException
1
2
| Path path = Paths.get("helloword/d1");
Files.createDirectory(path);
|
创建多级目录
1
2
| Path path = Paths.get("helloword/d1/d2");
Files.createDirectories(path);
|
拷贝文件
注意:
如果文件已存在,会抛异常 FileAlreadyExistsException
如果希望用 source 覆盖 掉 target,需要用 StandardCopyOption 来控制
Files.copy(source, target, StandardCopyOption.REPLACE_EXISTING);
1
2
3
4
| Path source = Paths.get("helloword/data.txt");
Path target = Paths.get("helloword/target.txt");
Files.copy(source, target);
|
移动文件
1
2
3
4
| Path source = Paths.get("helloword/data.txt");
Path target = Paths.get("helloword/data.txt");
Files.move(source, target, StandardCopyOption.ATOMIC_MOVE);
|
StandardCopyOption.ATOMIC_MOVE 保证文件移动的原子性
删除文件
1
2
3
| Path target = Paths.get("helloword/target.txt");
Files.delete(target);
|
如果文件不存在,会抛异常 NoSuchFileException
删除目录
1
2
3
| Path target = Paths.get("helloword/d1");
Files.delete(target);
|
如果目录还有内容,会抛异常 DirectoryNotEmptyException
遍历
可以使用Files工具类中的walkFileTree(Path, FileVisitor)方法,其中需要传入两个参数
- Path:文件起始路径
- FileVisitor:文件访问器,使用访问者模式
- preVisitDirectory:访问目录前的操作
- visitFile:访问文件的操作
- visitFileFailed:访问文件失败时的操作
- postVisitDirectory:访问目录后的操作
1
2
3
4
5
6
7
8
9
10
11
12
13
14
15
16
17
18
19
20
21
22
23
24
25
26
27
28
29
| public class TestWalkFileTree {
public static void main(String[] args) throws IOException {
Path path = Paths.get("F:\\JDK 8");
AtomicInteger dirCount = new AtomicInteger();
AtomicInteger fileCount = new AtomicInteger();
Files.walkFileTree(path, new SimpleFileVisitor<Path>(){
@Override
public FileVisitResult preVisitDirectory(Path dir, BasicFileAttributes attrs) throws IOException {
System.out.println("===>"+dir);
dirCount.incrementAndGet();
return super.preVisitDirectory(dir, attrs);
}
@Override
public FileVisitResult visitFile(Path file, BasicFileAttributes attrs) throws IOException {
System.out.println(file);
fileCount.incrementAndGet();
return super.visitFile(file, attrs);
}
});
System.out.println("文件目录数:"+dirCount.get());
System.out.println("文件数:"+fileCount.get());
}
}
|
拷贝多级目录
1
2
3
4
5
6
7
8
9
10
11
12
13
14
15
16
17
18
19
20
21
22
23
| public static void main(String[] args) throws IOException {
long start = System.currentTimeMillis();
String source = "D:\\Snipaste-1.16.2-x64";
String target = "D:\\Snipaste-1.16.2-x64aaa";
Files.walk(Paths.get(source)).forEach(path -> {
try {
String targetName = path.toString().replace(source, target);
if (Files.isDirectory(path)) {
Files.createDirectory(Paths.get(targetName));
}
else if (Files.isRegularFile(path)) {
Files.copy(path, Paths.get(targetName));
}
} catch (IOException e) {
e.printStackTrace();
}
});
long end = System.currentTimeMillis();
System.out.println(end - start);
}
|
网络编程
阻塞
阻塞模式下,相关方法都会导致线程暂停
ServerSocketChannel.accept 会在没有连接建立时让线程暂停
SocketChannel.read 会在通道中没有数据可读时让线程暂停
阻塞的表现其实就是线程暂停了,暂停期间不会占用 cpu,但线程相当于闲置
单线程下,阻塞方法之间相互影响,几乎不能正常工作,需要多线程支持
但多线程下,有新的问题,体现在以下方面
- 32 位 jvm 一个线程 320k,64 位 jvm 一个线程 1024k,如果连接数过多,必然导致 OOM,并且线程太多,反而会因为频繁上下文切换导致性能降低
- 可以采用线程池技术来减少线程数和线程上下文切换,但治标不治本,如果有很多连接建立,但长时间 inactive,会阻塞线程池中所有线程,因此不适合长连接,只适合短连接
服务端代码
1
2
3
4
5
6
7
8
9
10
11
12
13
14
15
16
17
18
19
20
21
22
23
24
25
26
27
28
29
30
| @Slf4j
public class Server {
public static void main(String[] args) throws IOException {
ByteBuffer byteBuffer = ByteBuffer.allocate(16);
ServerSocketChannel ssc = ServerSocketChannel.open();
ssc.bind(new InetSocketAddress(8080));
ArrayList<SocketChannel> channels = new ArrayList<>();
while (true){
log.debug("connecting...");
SocketChannel socketChannel = ssc.accept();
log.debug("connected...");
channels.add(socketChannel);
for (SocketChannel channel : channels) {
log.debug("before read...");
channel.read(byteBuffer);
byteBuffer.flip();
debugRead(byteBuffer);
byteBuffer.clear();
log.debug("after read...");
}
}
}
}
|
客户端代码
1
2
3
4
5
6
7
8
9
10
11
| public class Client {
public static void main(String[] args) {
try (SocketChannel socketChannel = SocketChannel.open()) {
socketChannel.connect(new InetSocketAddress("localhost", 8080));
System.out.println("waiting...");
} catch (IOException e) {
e.printStackTrace();
}
}
}
|
- 客户端-服务器建立连接前:服务器端因accept阻塞
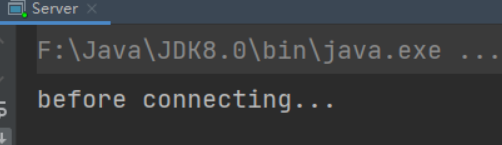
- 客户端-服务器建立连接后,客户端发送消息前:服务器端因通道为空被阻塞
- 客户端发送数据后,服务器处理通道中的数据。再次进入循环时,再次被accept阻塞
- 之前的客户端再次发送消息,服务器端因为被accept阻塞,无法处理之前客户端发送到通道中的信息

非阻塞
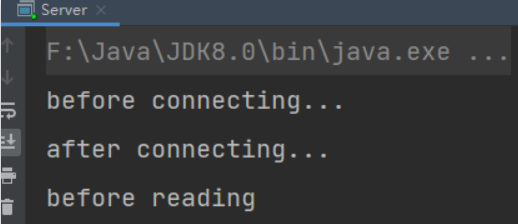
- 可以通过ServerSocketChannel的configureBlocking(false)方法将获得连接设置为非阻塞的。此时若没有连接,accept会返回null
- 可以通过SocketChannel的configureBlocking(false)方法将从通道中读取数据设置为非阻塞的。若此时通道中没有数据可读,read会返回-1
服务器端代码如下:
1
2
3
4
5
6
7
8
9
10
11
12
13
14
15
16
17
18
19
20
21
22
23
24
25
26
27
28
29
30
31
32
33
34
35
36
37
38
39
| public class Server {
public static void main(String[] args) {
ByteBuffer buffer = ByteBuffer.allocate(16);
try(ServerSocketChannel server = ServerSocketChannel.open()) {
server.bind(new InetSocketAddress(8080));
ArrayList<SocketChannel> channels = new ArrayList<>();
while (true) {
server.configureBlocking(false);
SocketChannel socketChannel = server.accept();
if (socketChannel != null) {
System.out.println("after connecting...");
channels.add(socketChannel);
}
for(SocketChannel channel : channels) {
channel.configureBlocking(false);
int read = channel.read(buffer);
if(read > 0) {
buffer.flip();
ByteBufferUtil.debugRead(buffer);
buffer.clear();
System.out.println("after reading");
}
}
}
} catch (IOException e) {
e.printStackTrace();
}
}
}
|
注意:这样写存在问题,因为设置为了非阻塞,会一直执行while(true)中的代码,CPU一直处于忙碌状态,会使得性能变低,所以实际情况中不使用这种方法处理请求
多路复用
单线程可以配合 Selector 完成对多个 Channel 可读写事件的监控,这称之为多路复用
多路复用仅针对网络 IO、普通文件 IO 没法利用多路复用
如果不用 Selector 的非阻塞模式,线程大部分时间都在做无用功,Selector 能够保证
- 有可连接事件时才去连接
- 有可读事件才去读取
- 有可写事件才去写入(限于网络传输能力,Channel 未必时时可写,一旦 Channel 可写,会触发 Selector 的可写事件)
Selector-Accept事件
使用Selector实现多路复用,完整代码如下:
1
2
3
4
5
6
7
8
9
10
11
12
13
14
15
16
17
18
19
20
21
22
23
24
25
26
27
28
29
30
31
32
33
34
35
36
37
38
39
40
41
42
43
44
| @Slf4j
public class Server {
public static void main(String[] args) throws IOException {
Selector selector = Selector.open();
ServerSocketChannel ssc = ServerSocketChannel.open();
ssc.configureBlocking(false);
SelectionKey sscKey = ssc.register(selector, 0, null);
sscKey.interestOps(SelectionKey.OP_ACCEPT);
log.debug("register key:{}",sscKey);
ssc.bind(new InetSocketAddress(8080));
while (true) {
selector.select();
Iterator<SelectionKey> iterator = selector.selectedKeys().iterator();
while (iterator.hasNext()) {
SelectionKey key = iterator.next();
log.debug("key:{}",key);
ServerSocketChannel channel = (ServerSocketChannel) key.channel();
SocketChannel sc = channel.accept();
log.debug("{}",sc);
}
}
}
}
|
步骤
1、获得选择器Selector
1
| Selector selector = Selector.open();
|
2、将channel设置为非阻塞模式,注册到selector中,并设置感兴趣的事件
- channel 必须工作在非阻塞模式
- FileChannel 没有非阻塞模式,因此不能配合 selector 一起使用
- 绑定事件类型
事件类型:
connect - 客户端连接成功时触发
accept - 服务器端成功接受连接时触发
read - 数据可读入时触发,有因为接收能力弱,数据暂不能读入的情况
write - 数据可写出时触发,有因为发送能力弱,数据暂不能写出的情况
1
2
3
4
|
server.configureBlocking(false);
server.register(selector, SelectionKey.OP_ACCEPT);
|
3、通过Selector监听事件,并获得就绪的通道个数,若没有通道就绪,线程会被阻塞
4、获取事件并得到对应的通道集合,通过遍历事件集合来处理事件
1
2
3
4
5
6
7
8
9
10
11
12
13
14
15
16
17
18
19
20
21
|
Set<SelectionKey> selectionKeys = selector.selectedKeys();
Iterator<SelectionKey> iterator = selectionKeys.iterator();
while (iterator.hasNext()) {
SelectionKey key = iterator.next();
if(key.isAcceptable()) {
ServerSocketChannel channel = (ServerSocketChannel) key.channel();
SocketChannel socketChannel = channel.accept();
iterator.remove();
}
}
|
注意:事件发生后,要么处理,要么取消(调用cancel方法),不能什么都不做,否则下次该事件仍会触发,这是因为 nio 底层使用的是水平触发
Selector-Read事件
1、在Accept事件中,若有客户端与服务器端建立了连接,需要将其对应的SocketChannel设置为非阻塞,并注册到选择其中
2、添加Read事件,触发后进行读取操作
1
2
3
4
5
6
7
8
9
10
11
12
13
14
15
16
17
18
19
20
21
22
23
24
25
26
27
28
29
30
31
32
33
34
35
36
37
38
39
40
41
42
43
44
45
46
47
48
49
50
51
52
53
54
55
56
57
58
59
60
61
62
| @Slf4j
public class Server {
public static void main(String[] args) throws IOException {
Selector selector = Selector.open();
ServerSocketChannel ssc = ServerSocketChannel.open();
ssc.configureBlocking(false);
SelectionKey sscKey = ssc.register(selector, 0, null);
sscKey.interestOps(SelectionKey.OP_ACCEPT);
log.debug("register key:{}",sscKey);
ssc.bind(new InetSocketAddress(8080));
while (true) {
selector.select();
Iterator<SelectionKey> iterator = selector.selectedKeys().iterator();
while (iterator.hasNext()) {
SelectionKey key = iterator.next();
log.debug("key:{}",key);
if (key.isAcceptable()){
ServerSocketChannel channel = (ServerSocketChannel) key.channel();
SocketChannel sc = channel.accept();
sc.configureBlocking(false);
SelectionKey scKey = sc.register(selector, 0, null);
scKey.interestOps(SelectionKey.OP_READ);
log.debug("{}",sc);
}else if (key.isReadable()){
SocketChannel channel = (SocketChannel) key.channel();
ByteBuffer buffer = ByteBuffer.allocate(16);
channel.read(buffer);
buffer.flip();
debugRead(buffer);
buffer.clear();
iterator.remove();
}
}
}
}
}
|
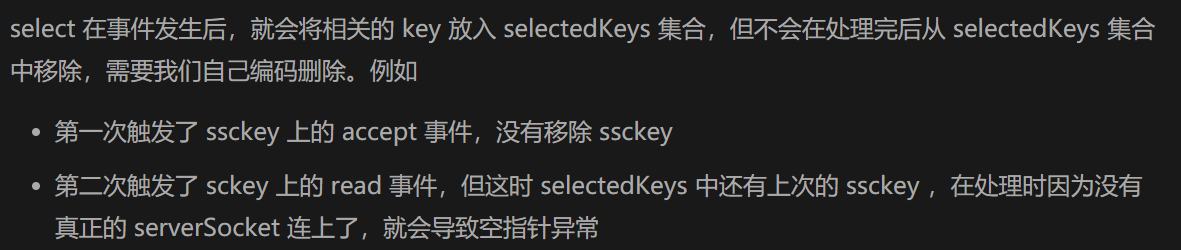
注意:当处理完一个事件后,一定要调用迭代器的remove方法移除对应事件,否则会出现错误
解析
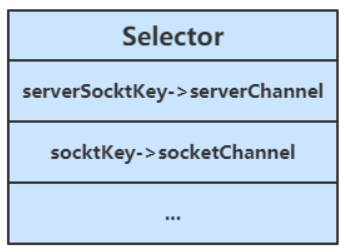
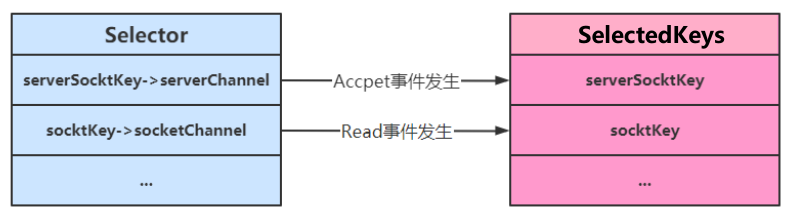
- 当调用了 server.register(selector, SelectionKey.OP_ACCEPT)后,Selector中维护了一个集合,用于存放SelectionKey以及其对应的通道
1
2
|
private SelectionKeyImpl[] channelArray = new SelectionKeyImpl[8];
|
1
2
3
4
5
| public class SelectionKeyImpl extends AbstractSelectionKey {
final SelChImpl channel;
...
}
|
- 当选择器中的通道对应的事件发生后,selectedKey会被放到另一个集合中,但是selectedKey不会自动移除,所以需要我们在处理完一个事件后,通过迭代器手动移除其中的selectedKey。否则会导致已被处理过的事件再次被处理,就会引发错误
断开处理
当客户端与服务器之间的连接断开时,会给服务器端发送一个读事件,对异常断开和正常断开需要加以不同的方式进行处理
1、异常断开:抛出IOException异常, 在try-catch的catch块中捕获异常并调用key的cancel方法即可
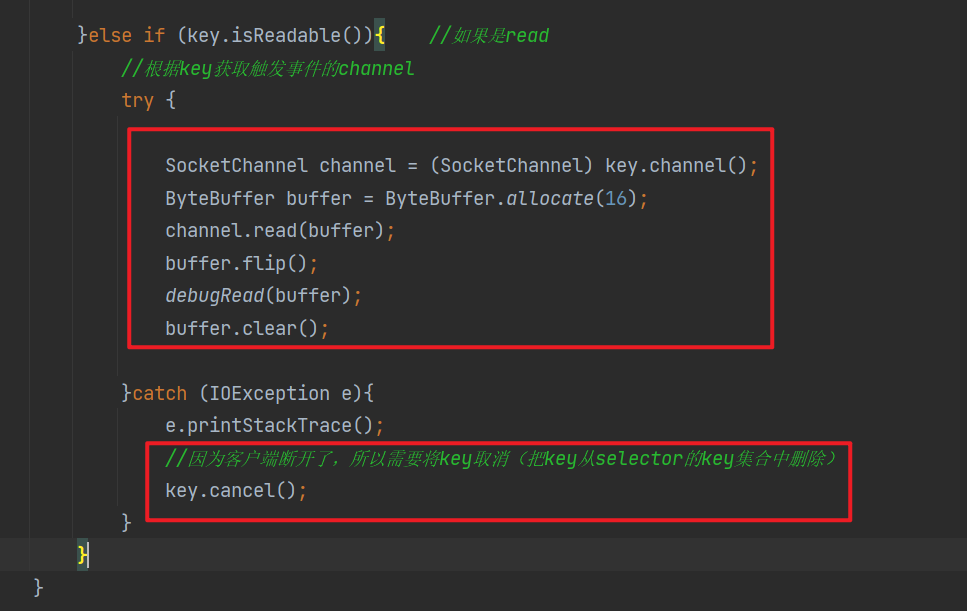
2、正常断开:服务器端的channel.read(buffer)方法的返回值为-1,所以当结束到返回值为-1时,需要调用key的cancel方法取消此事件,并在取消后移除该事件
1
2
3
4
5
6
7
8
9
10
11
12
13
14
15
16
17
18
19
20
|
if (key.isReadable()){
try {
SocketChannel channel = (SocketChannel) key.channel();
ByteBuffer buffer = ByteBuffer.allocate(16);
int read = channel.read(buffer);
if (read == -1){
key.cancel();
}
buffer.flip();
debugRead(buffer);
buffer.clear();
}catch (IOException e){
e.printStackTrace();
key.cancel();
}
}
|
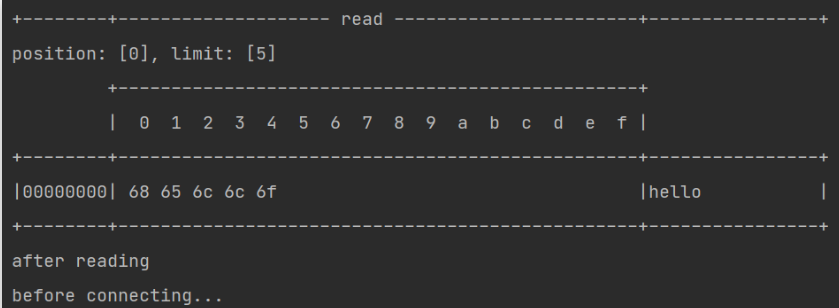
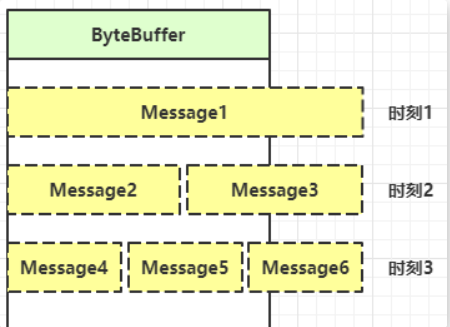
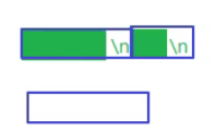
消息边界
演示消息边界问题:将缓冲区的大小设置为4个字节,发送2个汉字(你好),通过decode解码并打印时,会出现乱码
1
2
3
| ByteBuffer buffer = ByteBuffer.allocate(4);
System.out.println(StandardCharsets.UTF_8.decode(buffer));
|
这是因为UTF-8字符集下,1个汉字占用3个字节,此时缓冲区大小为4个字节,一次读时间无法处理完通道中的所有数据,所以一共会触发两次读事件。这就导致 你好 的 好 字被拆分为了前半部分和后半部分发送,解码时就会出现问题
传输的文本可能有以下三种情况
- 文本大于缓冲区大小(此时需要将缓冲区进行扩容)
- 发生半包现象
- 发生粘包现象
消息边界的解决思路
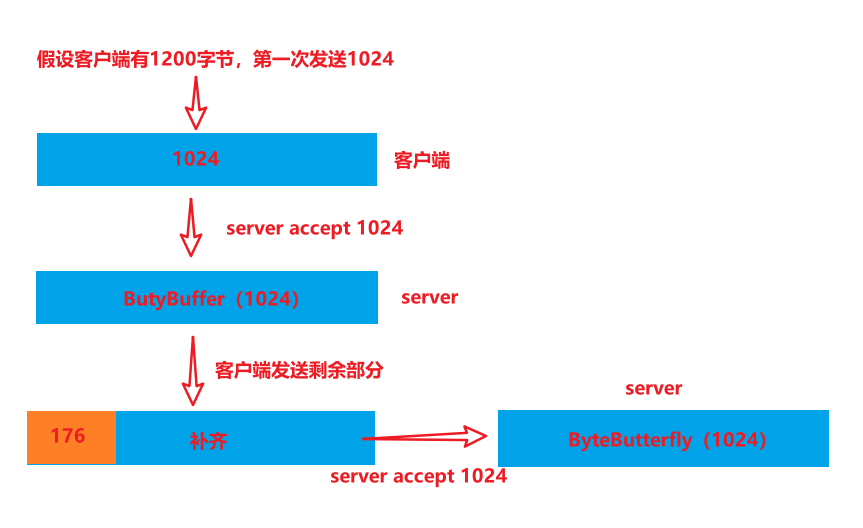
1、固定消息长度,数据包大小一样,服务器按预定长度读取,缺点是浪费带宽
例如:客户端可以与服务端约定,客户端每次发送1024字节,服务端每次接受1024字节,客户端超出的下一次发送,并且补齐不足的部分,使满足1024
2、按分隔符拆分,缺点是效率低(比如每次遇到\n,代表一条消息)
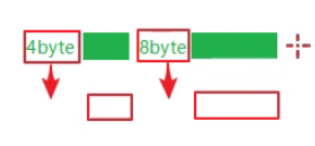
3、TLV 格式,即 Type 类型、Length 长度、Value 数据,类型和长度已知的情况下,就可以方便获取消息大小,分配合适的 buffer,缺点是 buffer 需要提前分配,如果内容过大,则影响 server 吞吐量
附件与扩容
Channel的register方法还有第三个参数:附件,可以向其中放入一个Object类型的对象,该对象会与登记的Channel以及其对应的SelectionKey绑定,可以从SelectionKey获取到对应通道的附件
1
| public final SelectionKey register(Selector sel, int ops, Object att)
|
可通过SelectionKey的attachment()方法获得附件
1
| ByteBuffer buffer = (ByteBuffer) key.attachment();
|
需要在Accept事件发生后,将通道注册到Selector中时,对每个通道添加一个ByteBuffer附件,让每个通道发生读事件时都使用自己的通道,避免与其他通道发生冲突而导致问题
1
2
3
4
5
|
socketChannel.configureBlocking(false);
ByteBuffer buffer = ByteBuffer.allocate(16);
socketChannel.register(selector, SelectionKey.OP_READ, buffer);
|
当调用compact方法后,如果出现position等于limit,说明缓冲区中的数据并未被读取(容量太小),此时创建新的缓冲区,其大小扩大为两倍。同时还要将旧缓冲区中的数据拷贝到新的缓冲区中,同时调用SelectionKey的attach方法将新的缓冲区作为新的附件放入SelectionKey中
1
2
3
4
5
6
| if (buffer.position() == buffer.limit()) {
ByteBuffer newBuffer = ByteBuffer.allocate(buffer.capacity() * 2);
buffer.flip();
newBuffer.put(buffer);
key.attach(newBuffer);
}
|
完整代码如下:
1
2
3
4
5
6
7
8
9
10
11
12
13
14
15
16
17
18
19
20
21
22
23
24
25
26
27
28
29
30
31
32
33
34
35
36
37
38
39
40
41
42
43
44
45
46
47
48
49
50
51
52
53
54
55
56
57
58
59
60
61
62
63
64
65
66
67
68
69
70
71
72
73
74
75
76
77
78
79
80
81
82
83
84
85
86
87
88
89
90
91
92
| public class SelectServer {
public static void main(String[] args) {
try(ServerSocketChannel server = ServerSocketChannel.open()) {
server.bind(new InetSocketAddress(8080));
Selector selector = Selector.open();
server.configureBlocking(false);
server.register(selector, SelectionKey.OP_ACCEPT);
while (true) {
int ready = selector.select();
System.out.println("selector ready counts : " + ready);
Set<SelectionKey> selectionKeys = selector.selectedKeys();
Iterator<SelectionKey> iterator = selectionKeys.iterator();
while (iterator.hasNext()) {
SelectionKey key = iterator.next();
if(key.isAcceptable()) {
ServerSocketChannel channel = (ServerSocketChannel) key.channel();
System.out.println("before accepting...");
SocketChannel socketChannel = channel.accept();
System.out.println("after accepting...");
socketChannel.configureBlocking(false);
ByteBuffer buffer = ByteBuffer.allocate(16);
socketChannel.register(selector, SelectionKey.OP_READ, buffer);
iterator.remove();
} else if (key.isReadable()) {
SocketChannel channel = (SocketChannel) key.channel();
System.out.println("before reading...");
ByteBuffer buffer = (ByteBuffer) key.attachment();
int read = channel.read(buffer);
if(read == -1) {
key.cancel();
channel.close();
} else {
split(buffer);
if (buffer.position() == buffer.limit()) {
ByteBuffer newBuffer = ByteBuffer.allocate(buffer.capacity()*2);
buffer.flip();
newBuffer.put(buffer);
key.attach(newBuffer);
}
}
System.out.println("after reading...");
iterator.remove();
}
}
}
} catch (IOException e) {
e.printStackTrace();
}
}
private static void split(ByteBuffer buffer) {
buffer.flip();
for(int i = 0; i < buffer.limit(); i++) {
if (buffer.get(i) == '\n') {
int length = i+1-buffer.position();
ByteBuffer target = ByteBuffer.allocate(length);
for(int j = 0; j < length; j++) {
target.put(buffer.get());
}
ByteBufferUtil.debugAll(target);
}
}
buffer.compact();
}
}
|
ByteBuffer大小分配
原因
1、每个channel都需要记录可能被切分的消息,因为ByteBuffer不能被多个channel共同使用,因此需要为每个channel维护一个独立的ByteBuffer
2、ByteBuffer不能太大,因为所需的内存是与连接数相关的,如果连接数过大,所需内存也会很大,因此需要设计大小可变的ByteBuffer
思路
1、开始时分配一个较小的buffer,如果发现数据不够,再分配内存大一点的buffer,再将原来的buffer拷贝到后来的buffer。优点是消息连续容易处理,缺点是数据拷贝耗费性能
2、使用多个数组组成buffer,一个数组不够,就把多出来的内容写入新的数组,与前面的区别是存储不连续导致解析复杂,优点是避免了拷贝引起的性能损耗
Selector-Write事件
当向客户端发送大量数据时,服务器不能一次性将大量数据全部发送到客户端。缓冲区大小是有限制的,当缓冲区满了的时候,就会出现以下返回0的情况,又因为buffer里面还存在剩余字节,所以就会无限循环,不断重试,直到将数据全部发送到客户端。
所以只要数据没发送完,那么就会卡在当前的SocketChannel上,其他的SocketChannel如果有事件来了,就无法处理,所以效率不是很高
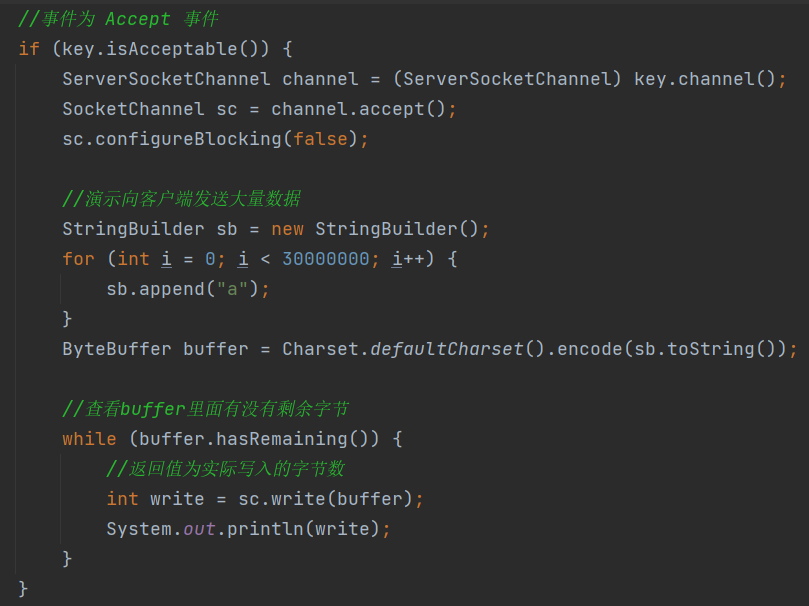
优化
服务器通过Buffer向通道中写入数据时,可能因为通道容量小于Buffer中的数据大小,导致无法一次性将Buffer中的数据全部写入到Channel中,这时便需要分多次写入
- 执行一次写操作,向将buffer中的内容写入到SocketChannel中,然后判断Buffer中是否还有数据
- 若Buffer中还有数据,则需要将SockerChannel注册到Seletor中,并关注写事件,同时将未写完的Buffer作为附件一起放入到SelectionKey中
1
2
3
4
5
6
7
| int write = socket.write(buffer);
if (buffer.hasRemaining()) {
socket.configureBlocking(false);
socket.register(selector, SelectionKey.OP_WRITE, buffer);
}
|
添加写事件的相关操作key.isWritable(),对Buffer再次进行写操作
- 每次写后需要判断Buffer中是否还有数据(是否写完)。若写完,需要移除SelecionKey中的Buffer附件,避免其占用过多内存,同时还需移除对写事件的关注
1
2
3
4
5
6
7
8
9
10
11
| SocketChannel socket = (SocketChannel) key.channel();
ByteBuffer buffer = (ByteBuffer) key.attachment();
int write = socket.write(buffer);
System.out.println(write);
if (!buffer.hasRemaining()) {
key.attach(null);
key.interestOps(0);
}
|
完整代码
1
2
3
4
5
6
7
8
9
10
11
12
13
14
15
16
17
18
19
20
21
22
23
24
25
26
27
28
29
30
31
32
33
34
35
36
37
38
39
40
41
42
43
44
45
46
47
48
49
50
51
52
53
54
55
56
57
58
59
60
61
62
| public static void main(String[] args) throws IOException {
ServerSocketChannel ssc = ServerSocketChannel.open();
ssc.configureBlocking(false);
Selector selector = Selector.open();
ssc.register(selector, SelectionKey.OP_ACCEPT);
ssc.bind(new InetSocketAddress(8080));
while (true){
selector.select();
Iterator<SelectionKey> iterator = selector.selectedKeys().iterator();
if (iterator.hasNext()) {
SelectionKey key = iterator.next();
iterator.remove();
if (key.isAcceptable()) {
ServerSocketChannel channel = (ServerSocketChannel) key.channel();
SocketChannel sc = channel.accept();
sc.configureBlocking(false);
SelectionKey selectionKey = sc.register(selector, 0, null);
StringBuilder sb = new StringBuilder();
for (int i = 0; i < 30000000; i++) {
sb.append("a");
}
ByteBuffer buffer = Charset.defaultCharset().encode(sb.toString());
int write = sc.write(buffer);
System.out.println(write);
if (buffer.hasRemaining()){
selectionKey.interestOps(selectionKey.interestOps() + SelectionKey.OP_WRITE);
selectionKey.attach(buffer);
}
}else if (key.isReadable()){
ByteBuffer buffer = (ByteBuffer) key.attachment();
SocketChannel sc = (SocketChannel) key.channel();
int write = sc.write(buffer);
System.out.println(write);
if (!buffer.hasRemaining()){
key.attach(null);
key.interestOps(key.interestOps() - SelectionKey.OP_WRITE);
}
}
}
}
}
|
多线程优化
充分利用多核CPU,分两组选择器
- 单线程配一个选择器(Boss),专门处理 accept 事件
- 创建 cpu 核心数的线程(Worker),每个线程配一个选择器,轮流处理 read 事件
实现思路
1、创建一个负责处理Accept事件的Boss线程,与多个负责处理Read事件的Worker线程
2、Boss线程执行的操作
- 接受并处理Accepet事件,当Accept事件发生后,调用Worker的register(SocketChannel socket)方法,让Worker去处理Read事件,其中需要根据标识robin去判断将任务分配给哪个Worker
1
2
3
4
5
6
|
Worker[] workers = new Worker[4];
AtomicInteger robin = new AtomicInteger(0);
workers[robin.getAndIncrement()% workers.length].register(socket);
|
- register(SocketChannel socket)方法会通过同步队列完成Boss线程与Worker线程之间的通信,让SocketChannel的注册任务被Worker线程执行。添加任务后需要调用selector.wakeup()来唤醒被阻塞的Selector
1
2
3
4
5
6
7
8
9
10
11
12
13
14
15
16
17
18
19
20
21
| public void register(final SocketChannel socket) throws IOException {
if (!started) {
}
queue.add(new Runnable() {
@Override
public void run() {
try {
socket.register(selector, SelectionKey.OP_READ);
} catch (IOException e) {
e.printStackTrace();
}
}
});
selector.wakeup();
}
|
Worker线程执行的操作:从同步队列中获取注册任务,并处理Read事件
1
2
3
4
5
6
7
8
9
10
11
12
13
14
15
16
17
18
19
20
21
22
23
| @Override
public void run() {
while (true){
try {
selector.select();
Iterator<SelectionKey> iterator = selector.selectedKeys().iterator();
while (iterator.hasNext()) {
SelectionKey selectionKey = iterator.next();
iterator.remove();
if (selectionKey.isReadable()){
ByteBuffer buffer = ByteBuffer.allocate(16);
SocketChannel channel = (SocketChannel) selectionKey.channel();
channel.read(buffer);
buffer.flip();
debugAll(buffer);
}
}
} catch (IOException e) {
e.printStackTrace();
}
}
}
|
完整代码
1
2
3
4
5
6
7
8
9
10
11
12
13
14
15
16
17
18
19
20
21
22
23
24
25
26
27
28
29
30
31
32
33
34
35
36
37
38
39
40
41
42
43
44
45
46
47
48
49
50
51
52
53
54
55
56
57
58
59
60
61
62
63
64
65
66
67
68
69
70
71
72
73
74
75
76
77
78
79
80
81
82
83
84
85
86
87
88
89
90
91
92
93
94
95
96
97
98
99
100
101
102
103
104
105
106
107
108
109
110
111
112
113
114
115
116
117
| public class ThreadsServer {
public static void main(String[] args) {
try (ServerSocketChannel server = ServerSocketChannel.open()) {
Thread.currentThread().setName("Boss");
server.bind(new InetSocketAddress(8080));
Selector boss = Selector.open();
server.configureBlocking(false);
server.register(boss, SelectionKey.OP_ACCEPT);
Worker[] workers = new Worker[4];
AtomicInteger robin = new AtomicInteger(0);
for(int i = 0; i < workers.length; i++) {
workers[i] = new Worker("worker-"+i);
}
while (true) {
boss.select();
Set<SelectionKey> selectionKeys = boss.selectedKeys();
Iterator<SelectionKey> iterator = selectionKeys.iterator();
while (iterator.hasNext()) {
SelectionKey key = iterator.next();
iterator.remove();
if (key.isAcceptable()) {
SocketChannel socket = server.accept();
System.out.println("connected...");
socket.configureBlocking(false);
System.out.println("before read...");
workers[robin.getAndIncrement()% workers.length].register(socket);
System.out.println("after read...");
}
}
}
} catch (IOException e) {
e.printStackTrace();
}
}
static class Worker implements Runnable {
private Thread thread;
private volatile Selector selector;
private String name;
private volatile boolean started = false;
private ConcurrentLinkedQueue<Runnable> queue;
public Worker(String name) {
this.name = name;
}
public void register(final SocketChannel socket) throws IOException {
if (!started) {
thread = new Thread(this, name);
selector = Selector.open();
queue = new ConcurrentLinkedQueue<>();
thread.start();
started = true;
}
queue.add(new Runnable() {
@Override
public void run() {
try {
socket.register(selector, SelectionKey.OP_READ);
} catch (IOException e) {
e.printStackTrace();
}
}
});
selector.wakeup();
}
@Override
public void run() {
while (true) {
try {
selector.select();
Runnable task = queue.poll();
if (task != null) {
task.run();
}
Set<SelectionKey> selectionKeys = selector.selectedKeys();
Iterator<SelectionKey> iterator = selectionKeys.iterator();
while(iterator.hasNext()) {
SelectionKey key = iterator.next();
iterator.remove();
if (key.isReadable()) {
SocketChannel socket = (SocketChannel) key.channel();
ByteBuffer buffer = ByteBuffer.allocate(16);
socket.read(buffer);
buffer.flip();
ByteBufferUtil.debugAll(buffer);
}
}
} catch (IOException e) {
e.printStackTrace();
}
}
}
}
}
|
NIO与BIO
stream与channel
1、stream不会自动缓冲数据,channel 会利用系统提供的发送缓冲区,接收缓冲区(更为底层)
2、stream仅支持阻塞API,channel 同时支持阻塞,非阻塞API,网络channel可配合selector实现多路复用
3、stream 和 channel 读和写可以同时进行(虽然stream是单向流动的,但是他也可以同时进行)
IO模型
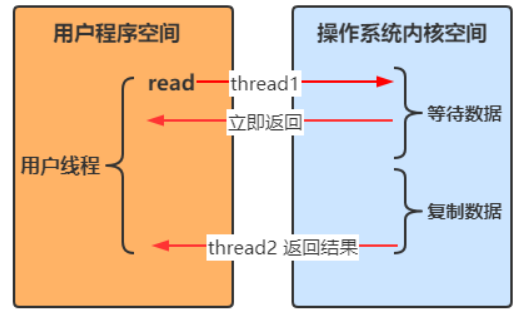
当调用一次 channel.read 或 stream.read 后,会由用户态切换至操作系统内核态来完成真正数据读取,而读取又分为两个阶段,分别为:等待数据阶段和复制数据阶段

阻塞IO
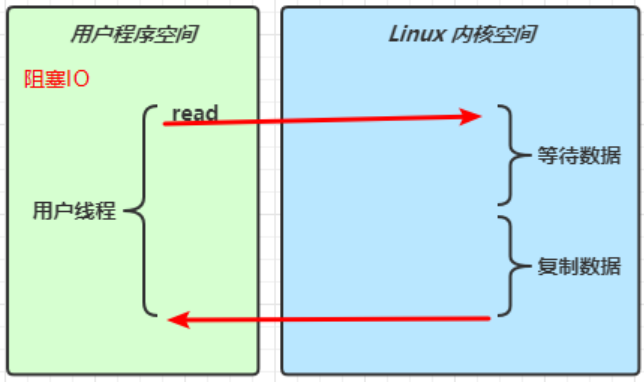
用户线程发起一次read请求,就会从用户程序空间切换到Linux内核空间,内核空间去真正地读取。当read方法阻塞时,线程停止,用户线程阻塞,等待数据复制。数据复制结束之后,再次切换回用户空间
非阻塞IO
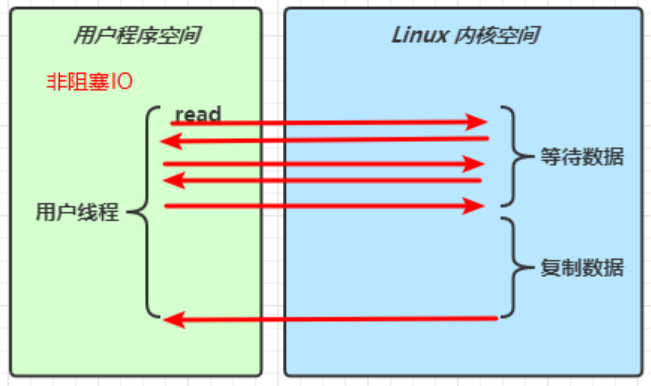
用户线程在一个循环中一直调用read方法,若内核空间中还没有数据可读,立即返回(只是在等待阶段非阻塞)
当发现内核空间中有数据后,等待内核空间执行复制数据,待复制结束后返回结果
多路复用
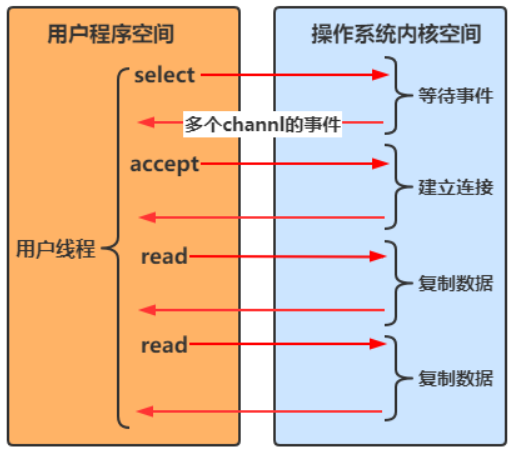
当没有事件时,调用select方法会被阻塞住,一旦有一个或多个事件发生后,就会处理对应的事件,从而实现多路复用
多路复用与阻塞IO的区别
- 阻塞IO模式下,若线程因accept事件被阻塞,发生read事件后,仍需等待accept事件执行完成后,才能去处理read事件
- 多路复用模式下,一个事件发生后,若另一个事件处于阻塞状态,不会影响该事件的执行
异步IO
线程1调用方法后立即返回,不会被阻塞也不需要立即获取结果,当方法的运行结果出来以后,由线程2将结果返回给线程1
同步:线程自己去获取结果(一个线程)
异步:线程自己不去获取结果,而是由其它线程返回结果(至少两个线程)
- 例如:线程A调用一个方法后,继续向下运行,运行结果由线程B返回
零拷贝
零拷贝指的是数据无需拷贝到 JVM 内存中,同时具有以下三个优点
- 更少的用户态与内核态的切换
- 不利用 cpu 计算,减少 cpu 缓存伪共享
- 零拷贝适合小文件传输
传统的IO问题
将一个文件通过 socket 写出
1
2
3
4
5
6
7
8
| File f = new File("helloword/data.txt");
RandomAccessFile file = new RandomAccessFile(file, "r");
byte[] buf = new byte[(int)f.length()];
file.read(buf);
Socket socket = ...;
socket.getOutputStream().write(buf);
|
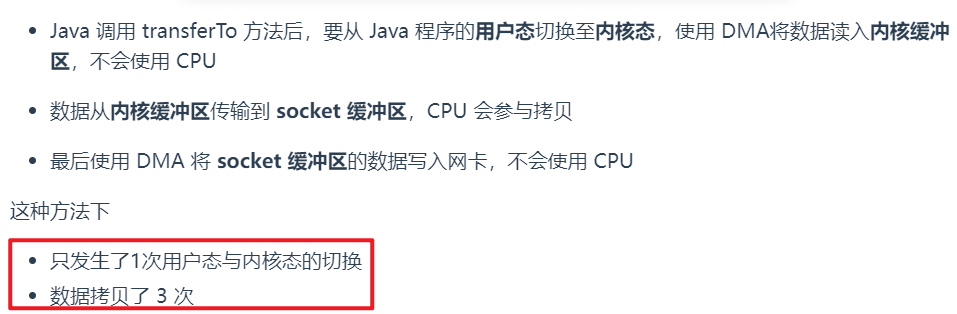
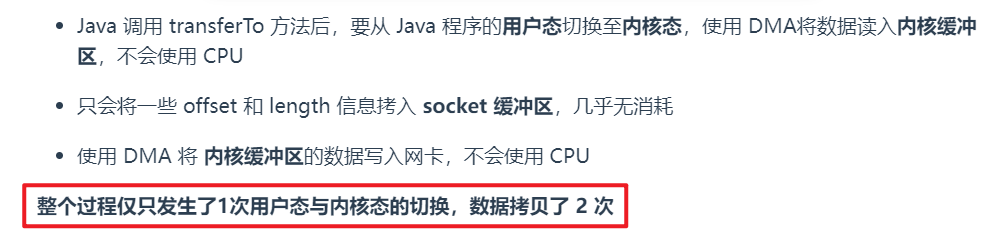
1、Java 本身并不具备 IO 读写能力,因此 read 方法调用后,要从 Java 程序的用户态切换至内核态,去调用操作系统(Kernel)的读能力,将数据读入内核缓冲区。这期间用户线程阻塞,操作系统使用 DMA(Direct Memory Access)来实现文件读,其间也不会使用 CPU
DMA 也可以理解为硬件单元,用来解放 cpu 完成文件 IO
2、从内核态切换回用户态,将数据从内核缓冲区读入用户缓冲区(即 byte[] buf),这期间 CPU 会参与拷贝,无法利用 DMA
3、调用 write 方法,这时将数据从用户缓冲区(byte[] buf)写入 socket 缓冲区,CPU 会参与拷贝
4、接下来要向网卡写数据,这项能力 Java 又不具备,因此又得从用户态切换至内核态,调用操作系统的写能力,使用 DMA 将 socket 缓冲区的数据写入网卡,不会使用 CPU
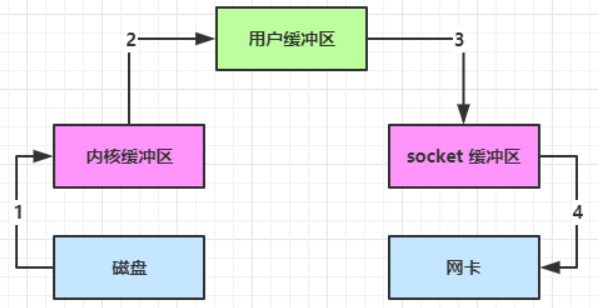
java 的 IO 实际不是物理设备级别的读写,而是缓存的复制,底层的真正读写是操作系统来完成的。用户态与内核态的切换发生了 3 次(这个操作比较重量级)数据拷贝了共 4 次
NIO 优化
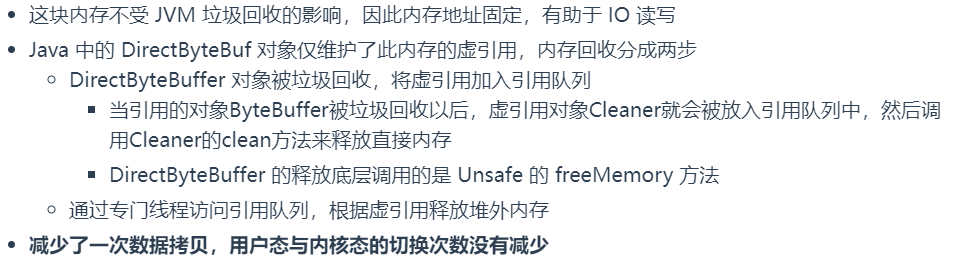
ByteBuffer.allocate(10):底层对应 HeapByteBuffer,使用的还是 Java 内存
ByteBuffer.allocateDirect(10):底层对应 DirectByteBuffer,使用的是操作系统内存

Java 可以使用 DirectByteBuffer 将堆外内存映射到 JVM 内存中来直接访问使用
进一步优化
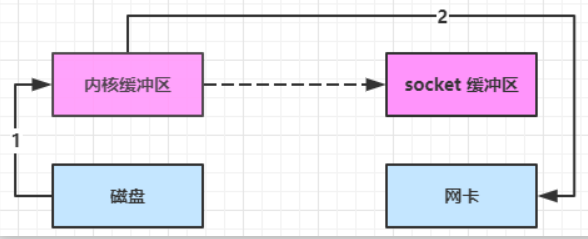
底层采用了 linux 2.1 后提供的 sendFile 方法,Java 中对应着两个 channel 调用 transferTo/transferFrom 方法拷贝数据
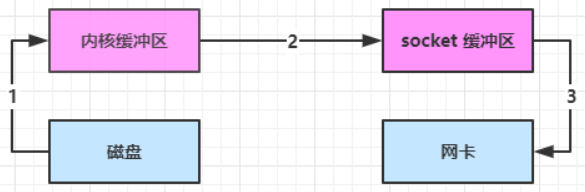
linux 2.4 对上述方法再次进行了优化
AIO
AIO 用来解决数据复制阶段的阻塞问题
- 同步意味着,在进行读写操作时,线程需要等待结果,还是相当于闲置
- 异步意味着,在进行读写操作时,线程不必等待结果,而是将来由操作系统来通过回调方式由另外的线程来获得结果