DispatcherServlet 初始化时机
启动类
1 2 3 4 5 >private static final Logger log = LoggerFactory.getLogger(A20.class); >public static void main (String[] args) throws Exception { >AnnotationConfigServletWebServerApplicationContext context = new AnnotationConfigServletWebServerApplicationContext (WebConfig.class); >}
Config类
1、创建内嵌的web容器工厂
2、创建 DispatcherServlet
3、注册 DispatcherServlet
1 2 3 4 5 6 7 8 9 10 11 12 13 14 15 16 17 18 19 20 21 22 >@Configuration >@ComponentScan >public class WebConfig { > >@Bean >public TomcatServletWebServerFactory tomcatServletWebServerFactory () { return new TomcatServletWebServerFactory (); >} > >@Bean >public DispatcherServlet dispatcherServlet () { return new DispatcherServlet (); >} > >@Bean >public DispatcherServletRegistrationBean dispatcherServletRegistrationBean (DispatcherServlet dispatcherServlet) { return new DispatcherServletRegistrationBean (dispatcherServlet,"/" ); >} >}
DispatcherServlet对象作为Spring容器的一个Bean,是由Spring容器创建的,但是它的初始化不是由Spring容器创建的,而是由tomcat服务器在首次使用到DispatcherServlet时由tomcat进行初始化。
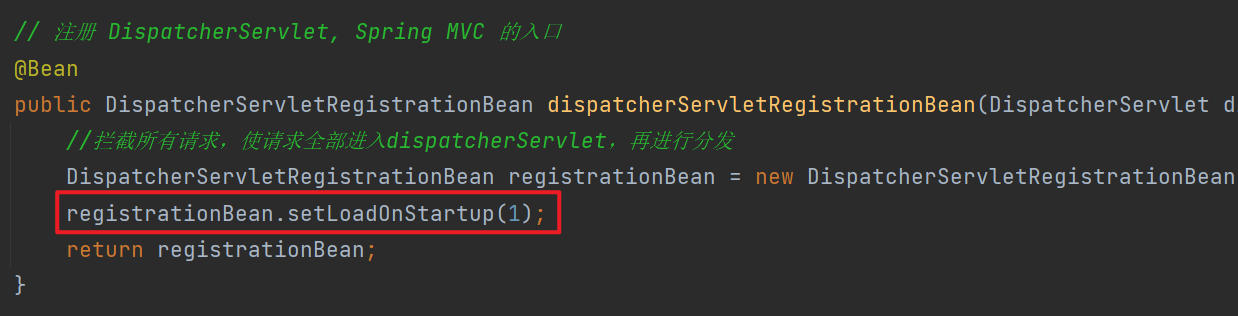
可以通过setLoadOnStartup方法设置优先级,来让tomcat一启动就加载DispatcherServlet
(数字越小优先级越高)
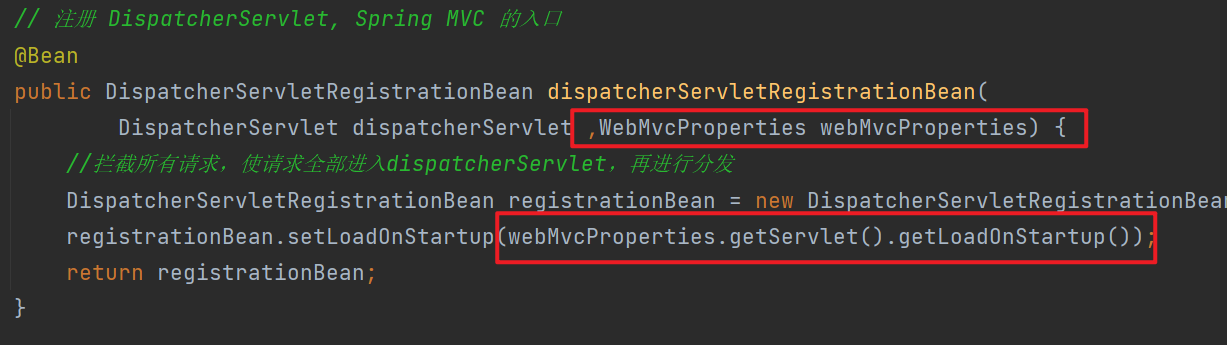
一般来说该优先级是写在application.properties文件中,从而避免耦合。所以需要在类上使用注解来读取properties文件
1 @PropertySource("classpath:application.properties")
还需要使用注解来绑定配置文件中的key,下面绑定的是properties文件中以spring.mvc开头和server开头的值
1 @EnableConfigurationProperties({WebMvcProperties.class,ServerProperties.class})
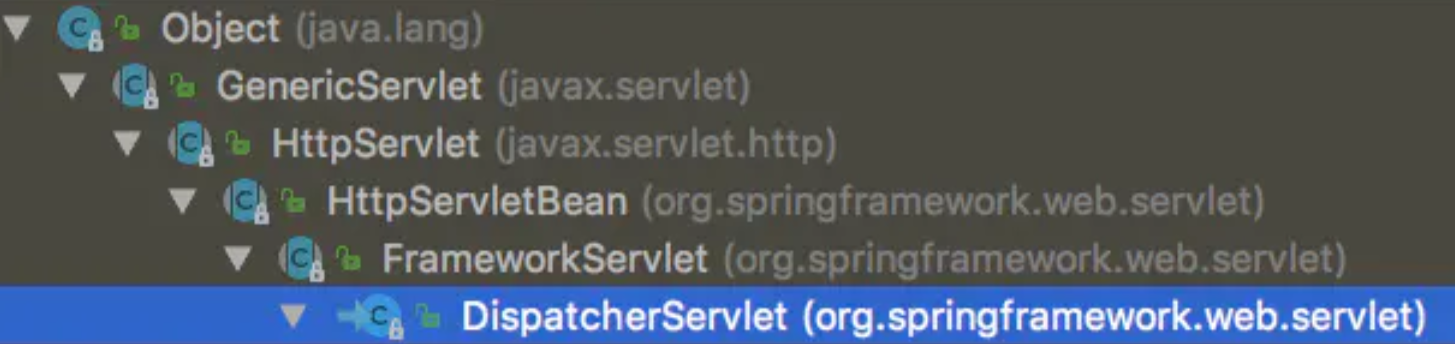
初始化 DispatcherServlet的类层次如下:
从客户端穿过来的所有请求都需要通过DispatcherServlet前端控制器来进行请求的分发处理,然后把响应结果返回给客户端,它的本质其实也是一个Servlet,和其他Servlet一样有着同样的生命周期(Servlet 简介)
1、初始化 2、运行 3、销毁
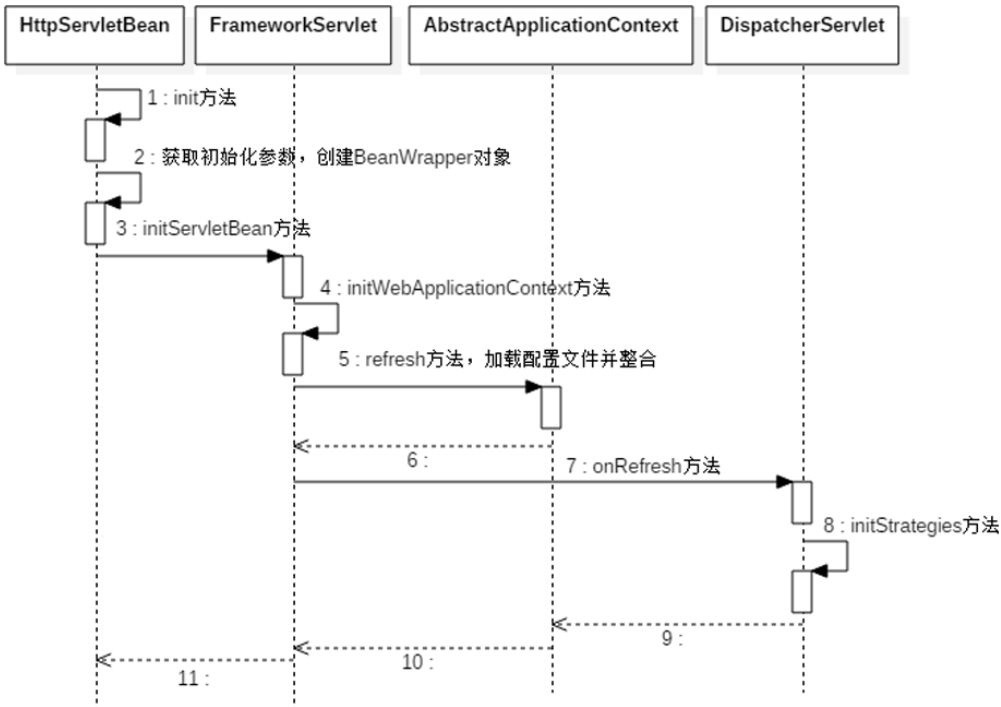
下图为DispatcherServlet的初始化过程
DispatcherServlet的初始化工作并没有在DispatcherServlet类中进行,而是在HttpServletBean类中重写了init()方法,代码如下
步骤:
1、init()方法通过实例化ServletConfigPropertyValues对servlet进行参数初始化
2、参数初始化之后,会把DispatcherServlet转换为BeanWrapper,将其当作一个Bean去管理,这样就可以通过Spring的依赖注入对参数的值进行注入(通过bw.setPropertyValues(pvs, true);进行注入)
3、调用的模板方法initBeanWrapper在HttpServletBean的子类中实现
1
2
3
4
5
6
7
8
9
10
11
12
13
14
15
16
17
18
19
20
21
22
23
24
25
26
27
28
@Override public final void init () throws ServletException { PropertyValues pvs = new ServletConfigPropertyValues (getServletConfig(), this .requiredProperties); if (!pvs.isEmpty()) { try { BeanWrapper bw = PropertyAccessorFactory.forBeanPropertyAccess(this ); ResourceLoader resourceLoader = new ServletContextResourceLoader (getServletContext()); bw.registerCustomEditor(Resource.class, new ResourceEditor (resourceLoader, getEnvironment())); initBeanWrapper(bw); bw.setPropertyValues(pvs, true ); } catch (BeansException ex) { if (logger.isErrorEnabled()) { logger.error("Failed to set bean properties on servlet '" + getServletName() + "'" , ex); } throw ex; } } initServletBean(); }
4、initBeanWrapper方法在FrameworkServlet类中的重写实现,主要是对web上下文进行初始化,代码如下:
注意:ContextLoaderListener加载的时候已经创建了WebApplicationContext实例,这里是对这个实例的进一步补充初始化
1
2
3
4
5
6
7
8
9
10
11
12
13
14
15
16
17
18
19
20
21
22
23
24
25
26
27
28
29
30
31
@Override protected final void initServletBean () throws ServletException { getServletContext().log("Initializing Spring " + getClass().getSimpleName() + " '" + getServletName() + "'" ); if (logger.isInfoEnabled()) { logger.info("Initializing Servlet '" + getServletName() + "'" ); } long startTime = System.currentTimeMillis(); try { this .webApplicationContext = initWebApplicationContext(); initFrameworkServlet(); } catch (ServletException | RuntimeException ex) { logger.error("Context initialization failed" , ex); throw ex; } if (logger.isDebugEnabled()) { String value = this .enableLoggingRequestDetails ? "shown which may lead to unsafe logging of potentially sensitive data" : "masked to prevent unsafe logging of potentially sensitive data" ; logger.debug("enableLoggingRequestDetails='" + this .enableLoggingRequestDetails + "': request parameters and headers will be " + value); } if (logger.isInfoEnabled()) { logger.info("Completed initialization in " + (System.currentTimeMillis() - startTime) + " ms" ); } }
5、initWebApplicationContext方法主要是负责初始化DispatcherServlet自己的应用上下文
先查看FrameworkServlet在构造时,是否传入一个WebApplicationContext,如果不会就会查找,仍然没有查到,则会自己创建一个WebApplicationContext,最后对WebApplicationContext进行onRefresh()操作完成对上下文的创建,onRefresh还是一个模板方法,让子类实现
1
2
3
4
5
6
7
8
9
10
11
12
13
14
15
16
17
18
19
20
21
22
23
24
25
26
27
28
29
30
31
32
33
34
35
36
37
38
39
40
41
42
43
44
protected WebApplicationContext initWebApplicationContext () { WebApplicationContext rootContext = WebApplicationContextUtils.getWebApplicationContext(getServletContext()); WebApplicationContext wac = null ; if (this .webApplicationContext != null ) { wac = this .webApplicationContext; if (wac instanceof ConfigurableWebApplicationContext) { ConfigurableWebApplicationContext cwac = (ConfigurableWebApplicationContext) wac; if (!cwac.isActive()) { if (cwac.getParent() == null ) { cwac.setParent(rootContext); } configureAndRefreshWebApplicationContext(cwac); } } } if (wac == null ) { wac = findWebApplicationContext(); } if (wac == null ) { wac = createWebApplicationContext(rootContext); } if (!this .refreshEventReceived) { synchronized (this .onRefreshMonitor) {、 onRefresh(wac); } } if (this .publishContext) { String attrName = getServletContextAttributeName(); getServletContext().setAttribute(attrName, wac); } return wac; }
RequestMappingHandlerMapping RequestMappingHandlerMapping 初始化时,会收集所有 @RequestMapping 映射信息,封装为 Map,其中
key 是 RequestMappingInfo 类型,包括请求路径、请求方法等信息
value 是 HandlerMethod 类型,包括控制器方法对象、控制器对象
有了这个 Map,就可以在请求到达时,快速完成映射,找到 HandlerMethod 并与匹配的拦截器一起返回给 DispatcherServlet
1
2
3
4
5
6
7
8
9
10
11
12
13
14
15
public class A20 { private static final Logger log = LoggerFactory.getLogger(A20.class); public static void main (String[] args) throws Exception { AnnotationConfigServletWebServerApplicationContext context = new AnnotationConfigServletWebServerApplicationContext (WebConfig.class); RequestMappingHandlerMapping handlerMapping = context.getBean(RequestMappingHandlerMapping.class); Map<RequestMappingInfo, HandlerMethod> handlerMethods = handlerMapping.getHandlerMethods(); HandlerExecutionChain chain = handlerMapping.getHandler(new MockHttpServletRequest ("GET" , "/test1" )); } }
RequestMappingHandlerAdapter 因为RequestMappingHandlerAdapter里面invokeHandlerMethod方法是私有的,所以我们创建一个子类去继承他,然后重写该方法,将该方法改为public
1
2
3
4
5
6
public class MyRequestMappingHandlerAdapter extends RequestMappingHandlerAdapter { @Override public ModelAndView invokeHandlerMethod (HttpServletRequest request, HttpServletResponse response, HandlerMethod handlerMethod) throws Exception { return super .invokeHandlerMethod(request, response, handlerMethod); } }
RequestMappingHandlerAdapter 内部含有大量的web基础组件来协助完成一整个请求处理,因此它可以被描述为单个请求的调度、处理中心,如:
HandlerMethodArgumentResolver 解析控制器方法参数
HandlerMethodReturnValueHandler 处理控制器方法返回值
1 2 3 4 5 6 7 8 9 10 11 12 13 14 15 16 17 18 19 20 21 22 23 MockHttpServletRequest request = new MockHttpServletRequest ("POST" , "/test2" ); request.setParameter("name" ,"张三" ); MockHttpServletResponse response = new MockHttpServletResponse (); RequestMappingHandlerMapping handlerMapping = context.getBean(RequestMappingHandlerMapping.class); MyRequestMappingHandlerAdapter handlerAdapter = context.getBean(MyRequestMappingHandlerAdapter.class); handlerAdapter.invokeHandlerMethod(request,response, (HandlerMethod) chain.getHandler()); List<HandlerMethodArgumentResolver> argumentResolvers = handlerAdapter.getArgumentResolvers(); for (HandlerMethodArgumentResolver argumentResolver : argumentResolvers) { System.out.println(argumentResolver); } for (HandlerMethodReturnValueHandler returnValueHandler : handlerAdapter.getReturnValueHandlers()) { System.out.println(returnValueHandler); }
自定义参数解析器 为了让handlerAdapter能够识别自定义的参数解析器,在Config里调用setCustomArgumentResolvers方法将自定义的参数解析器加入到handlerAdapter中
1
2
3
4
5
6
7
@Bean public RequestMappingHandlerAdapter requestMappingHandlerAdapter () { TokenArgumentResolver tokenArgumentResolver = new TokenArgumentResolver (); MyRequestMappingHandlerAdapter handlerAdapter = new MyRequestMappingHandlerAdapter (); handlerAdapter.setCustomArgumentResolvers(List.of(tokenArgumentResolver)); return handlerAdapter; }
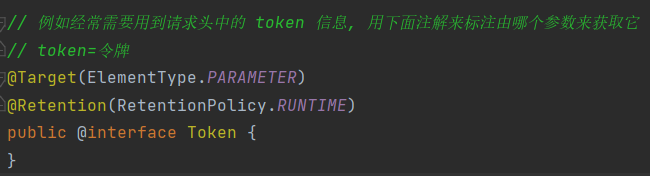
创建自定义的参数解析器(实现HandlerMethodArgumentResolver接口)
1
2
3
4
5
6
7
8
9
10
11
12
13
14
15
16
public class TokenArgumentResolver implements HandlerMethodArgumentResolver { @Override public boolean supportsParameter (MethodParameter parameter) { Token token = parameter.getParameterAnnotation(Token.class); return token != null ; } @Override public Object resolveArgument (MethodParameter parameter, ModelAndViewContainer mavContainer, NativeWebRequest webRequest, WebDataBinderFactory binderFactory) throws Exception { return webRequest.getHeader("token" ); } }
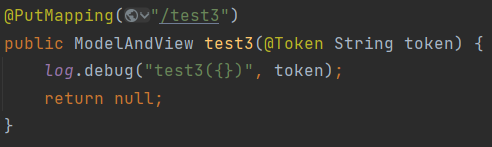
创建虚拟请求,并进行测试
1
2
3
4
5
6
7
8
9
10
11
12
13
14
15
16
17
18
19
20
AnnotationConfigServletWebServerApplicationContext context = new AnnotationConfigServletWebServerApplicationContext (WebConfig.class); MockHttpServletRequest request = new MockHttpServletRequest ("PUT" , "/test3" );request.addHeader("token" ,"令牌" ); MockHttpServletResponse response = new MockHttpServletResponse ();MyRequestMappingHandlerAdapter handlerAdapter = context.getBean(MyRequestMappingHandlerAdapter.class);RequestMappingHandlerMapping handlerMapping = context.getBean(RequestMappingHandlerMapping.class); HandlerExecutionChain chain = handlerMapping.getHandler(request);MyRequestMappingHandlerAdapter handlerAdapter = context.getBean(MyRequestMappingHandlerAdapter.class); handlerAdapter.invokeHandlerMethod(request,response, (HandlerMethod) chain.getHandler());
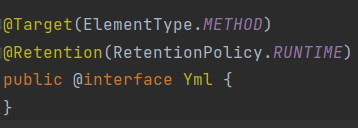
自定义的返回值处理器 自定义@Yml注解,将返回值对象转换为yaml格式
创建自定义的返回值处理器(实现HandlerMethodReturnValueHandler接口)
1
2
3
4
5
6
7
8
9
10
11
12
13
14
15
16
17
18
19
20
21
22
23
24
25
26
27
public class YmlReturnValueHandler implements HandlerMethodReturnValueHandler { @Override public boolean supportsReturnType (MethodParameter returnType) { Yml yml = returnType.getMethodAnnotation(Yml.class); return yml != null ; } @Override public void handleReturnValue (Object returnValue, MethodParameter returnType, ModelAndViewContainer mavContainer, NativeWebRequest webRequest) throws Exception { String str = new Yaml ().dump(returnValue); HttpServletResponse response = webRequest.getNativeResponse(HttpServletResponse.class); response.setContentType("text/plain;charset=utf-8" ); response.getWriter().print(str); mavContainer.setRequestHandled(true ); } }
为了让handlerAdapter能够识别自定义的返回值解析器,在Config里调用setCustomReturnValueHandlers方法将自定义的返回值解析器加入到handlerAdapter中
1
2
3
4
5
6
7
8
@Bean public RequestMappingHandlerAdapter requestMappingHandlerAdapter () { TokenArgumentResolver tokenArgumentResolver = new TokenArgumentResolver (); YmlReturnValueHandler ymlReturnValueHandler = new YmlReturnValueHandler (); handlerAdapter.setCustomReturnValueHandlers(List.of(ymlReturnValueHandler)); return handlerAdapter; }
创建虚拟请求,并进行测试
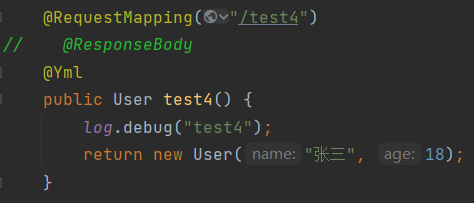
1
2
3
4
5
6
7
8
9
10
11
12
13
14
15
16
17
18
19
20
21
22
23
24
AnnotationConfigServletWebServerApplicationContext context = new AnnotationConfigServletWebServerApplicationContext (WebConfig.class); MockHttpServletRequest request = new MockHttpServletRequest ("GET" , "/test4" );MockHttpServletResponse response = new MockHttpServletResponse ();MyRequestMappingHandlerAdapter handlerAdapter = context.getBean(MyRequestMappingHandlerAdapter.class);RequestMappingHandlerMapping handlerMapping = context.getBean(RequestMappingHandlerMapping.class); HandlerExecutionChain chain = handlerMapping.getHandler(request);MyRequestMappingHandlerAdapter handlerAdapter = context.getBean(MyRequestMappingHandlerAdapter.class); handlerAdapter.invokeHandlerMethod(request,response, (HandlerMethod) chain.getHandler()); byte [] content = response.getContentAsByteArray();System.out.println(new String (content, StandardCharsets.UTF_8));
参数解析器 准备工作 定义一个控制器类ControllerUser,在其中测试常见参数的解析,同时定义测试需要的实体类User,具体实现如下:
1
2
3
4
5
6
7
8
9
10
11
12
13
14
15
16
17
18
19
20
21
22
23
24
25
26
27
28
29
30
31
32
33
34
35
36
37
38
static class Controller { public void test (@RequestParam("name1") String name1, String name2, @RequestParam("age") int age, @RequestParam(name = "home", defaultValue = "${CATALINA_HOME}") String home1, @RequestParam("file") MultipartFile file, @PathVariable("id") int id, @RequestHeader("Content-Type") String header, @CookieValue("token") String token, @Value("${CATALINA_HOME}") String home2, HttpServletRequest request, @ModelAttribute User user1, User user2, @RequestBody User user3 ) { } } static class User { private String name; private int age; public String getName () { return name; } public void setName (String name) {this .name = name;} public int getAge () {return age;} public void setAge (int age) {this .age = age;} @Override public String toString () { return "User{" + "name='" + name + '\'' + ", age=" + age + '}' ; } }
定义一个模拟浏览器发送请求的方法mockRequest(),方便进行测试,具体实现如下:
1
2
3
4
5
6
7
8
9
10
11
12
13
14
15
16
17
18
19
20
private static HttpServletRequest mockRequest () { MockHttpServletRequest request = new MockHttpServletRequest (); request.setParameter("name1" , "zhangsan" ); request.setParameter("name2" , "lisi" ); request.addPart(new MockPart ("file" , "abc" , "hello" .getBytes(StandardCharsets.UTF_8))); Map<String, String> map = new AntPathMatcher () .extractUriTemplateVariables("/test/{id}" , "/test/123" ); request.setAttribute(HandlerMapping.URI_TEMPLATE_VARIABLES_ATTRIBUTE, map); request.setContentType("application/json" ); request.setCookies(new Cookie ("token" , "123456" )); request.setParameter("name" , "zhangsan" ); request.setParameter("age" , "18" ); request.setContent(""" { "name":"李四", "age":20 }""" .getBytes(StandardCharsets.UTF_8)); return new StandardServletMultipartResolver ().resolveMultipart(request); }
解析@RequestParam注解 RequestMappingHandlerAdapter 的调用过程
控制器方法被封装为 HandlerMethod 准备对象绑定与类型转换 准备 ModelAndViewContainer 用来存储中间 Model 结果 解析每个参数值
1
2
3
4
5
6
7
8
9
10
11
12
13
14
15
16
17
18
19
20
21
22
23
24
25
26
27
28
29
30
31
32
33
34
35
36
37
38
public static void main (String[] args) throws Exception { AnnotationConfigApplicationContext context = new AnnotationConfigApplicationContext (WebConfig.class); DefaultListableBeanFactory beanFactory = context.getDefaultListableBeanFactory(); HttpServletRequest request = mockRequest(); HandlerMethod handlerMethod = new HandlerMethod (new Controller (), Controller.class.getMethod("test" , String.class, String.class, int .class, String.class, MultipartFile.class, int .class, String.class, String.class, String.class, HttpServletRequest.class, User.class, User.class, User.class)); ServletRequestDataBinderFactory factory = new ServletRequestDataBinderFactory (null ,null ); ModelAndViewContainer container = new ModelAndViewContainer (); for (MethodParameter parameter : handlerMethod.getMethodParameters()) { RequestParamMethodArgumentResolver resolver = new RequestParamMethodArgumentResolver (beanFactory, false ); String annotations = Arrays.stream(parameter.getParameterAnnotations()).map(a -> a.annotationType().getSimpleName()).collect(Collectors.joining()); String str = annotations.length() > 0 ? " @" + annotations + " " : " " ; parameter.initParameterNameDiscovery(new DefaultParameterNameDiscoverer ()); if (resolver.supportsParameter(parameter)) { Object v = resolver.resolveArgument(parameter, container, new ServletWebRequest (request), factory); System.out.println("[" + parameter.getParameterIndex() + "]" + str + parameter.getParameterType().getSimpleName() + " " + parameter.getParameterName() + "->" + v); System.out.println("模型数据为:" +container.getModel()); } else { System.out.println("[" + parameter.getParameterIndex() + "]" + str + parameter.getParameterType().getSimpleName() + " " + parameter.getParameterName()); } } }
测试结果如下:
可以看出加了@RequestParam注解的参数都已经被解析,没有加@RequestParam注解的参数没有被解析
1 2 3 4 5 6 7 8 9 10 11 12 13 14 15 16 17 18 [0 ] @RequestParam String name1->zhangsan 模型数据为:{} [1 ] String name2 [2 ] @RequestParam int age->18 模型数据为:{} 09:47 :47.789 [main] DEBUG org.springframework.core.env.PropertySourcesPropertyResolver - Found key 'CATALINA_HOME' in PropertySource 'systemEnvironment' with value of type String [3 ] @RequestParam String home1->D:\Tomcat\apache-tomcat-9.0 .37 模型数据为:{} [4 ] @RequestParam MultipartFile file->org.springframework.web.multipart.support.StandardMultipartHttpServletRequest$StandardMultipartFile@525575 模型数据为:{} [5 ] @PathVariable int id [6 ] @RequestHeader String header [7 ] @CookieValue String token [8 ] @Value String home2 [9 ] HttpServletRequest request [10 ] @ModelAttribute User user1 [11 ] User user2 [12 ] @RequestBody User user3
组合参数解析器 添加多个解析器组合HandlerMethodArgumentResolverComposite ,在其中添加解析各个注解所需的解析器,具体实现如下:
1 2 3 4 5 6 7 8 9 10 11 12 13 14 15 16 17 18 19 20 21 22 23 24 HandlerMethodArgumentResolverComposite composite = new HandlerMethodArgumentResolverComposite (); composite.addResolvers( new RequestParamMethodArgumentResolver (beanFactory,false ), new PathVariableMethodArgumentResolver (), new RequestHeaderMethodArgumentResolver (beanFactory), new ServletCookieValueMethodArgumentResolver (beanFactory), new ExpressionValueMethodArgumentResolver (beanFactory), new ServletRequestMethodArgumentResolver (), new ServletModelAttributeMethodProcessor (false ), new RequestResponseBodyMethodProcessor (List.of(new MappingJackson2HttpMessageConverter ())), new ServletModelAttributeMethodProcessor (true ), new RequestParamMethodArgumentResolver (beanFactory,true ) ); if (composite.supportsParameter(parameter)) { Object v = composite.resolveArgument(parameter, container, new ServletWebRequest (request), factory); System.out.println("[" + parameter.getParameterIndex() + "]" + str + parameter.getParameterType().getSimpleName() + " " + parameter.getParameterName() + "->" + v); System.out.println("模型数据为:" +container.getModel()); } else { System.out.println("[" + parameter.getParameterIndex() + "]" + str + parameter.getParameterType().getSimpleName() + " " + parameter.getParameterName()); } }
常见的参数解析 调用组合解析器的addResolvers进行添加
@RequestParam ==> RequestParamMethodArgumentResolver(beanFactory,false)
省略 @RequestParam ==> RequestParamMethodArgumentResolver(beanFactory,true)
@RequestParam(defaultValue)
@PathVariable ==> PathVariableMethodArgumentResolver()
@RequestHeader ==> RequestHeaderMethodArgumentResolver(beanFactory)
@CookieValue ==> ServletCookieValueMethodArgumentResolver(beanFactory)
@Value ==> ExpressionValueMethodArgumentResolver(beanFactory)
HttpServletRequest 等 ==> ServletRequestMethodArgumentResolver()
@ModelAttribute ==> ServletModelAttributeMethodProcessor(false)
省略 @ModelAttribute ==> ServletModelAttributeMethodProcessor(true)
@RequestBody ==> RequestResponseBodyMethodProcessor(List.of(new MappingJackson2HttpMessageConverter()))
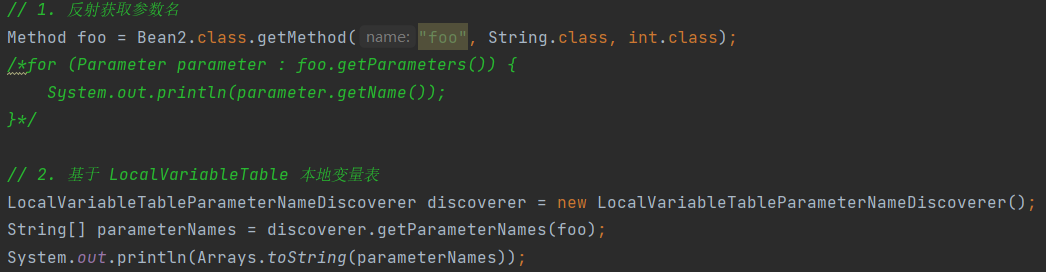
获取参数名 准备工作 在自己的工程下面创建新的文件夹,不要放在src目录下(为了避免idea自动编译它,可以减少idea在自动编译时添加的一些选项),创建Bean2.Java文件 ,文件内容如下:
1
2
3
4
public class Bean2 { public void foo (String name,int age) { } }
测试 在终端中通过javac命令编译Bean2,编译后生成的class文件,通过idea反编译查看,发现没有参数名称
此时通过 javac -parameters .\Bean2.java 命令重新进行编译,就可以获取到参数名称
1
2
3
4
5
public class Bean2 { public Bean2 () {} public void foo (String var1, int var2) { } }
测试通过 javac -g .\Bean2.java 命令重新进行编译,查看编译后生成的class文件,发现此时也是可以获取到参数名
通过 javap -c -v .\Bean2.class 命令分别反编译上述两个命令生成的class文件,可以看到通过 javac -parameters .\Bean2.java 编译生成的class文件中会生成一个MethodParameters,在其中会包含参数信息;通过 javac -g .\Bean2.java 编译生成的class文件中会生成一 LocalVariableTable 本地变量表,其中也会包含参数信息
通过以下两种方式再次进行测试后,可以发现编译时添加了 -parameters 生成的参数表,可以通过反射拿到参数名,添加-g生成的本地变量表无法通过反射拿到参数名
总结 如果编译时添加了 -parameters 参数可以生成参数表, 反射时就可以拿到参数名
如果编译时添加了 -g 可以生成调试信息, 但分为两种情况
这也是 MyBatis 在实现 Mapper 接口时为何要提供 @Param 注解来辅助获得参数名
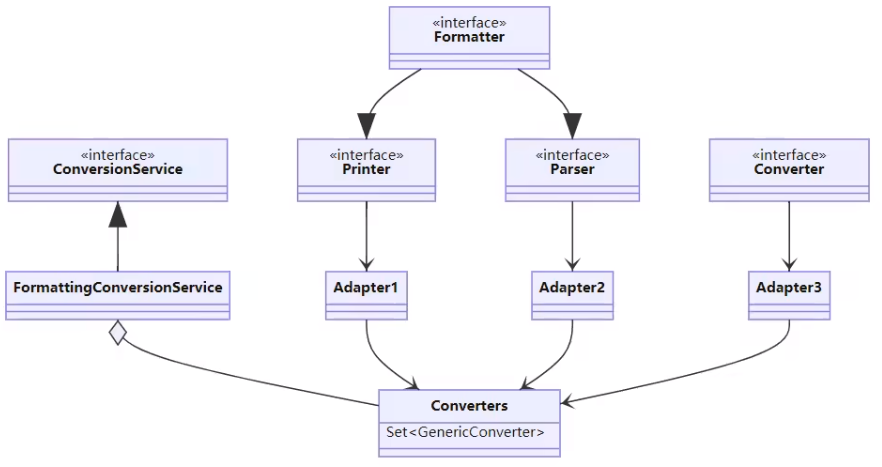
对象绑定和类型转换 底层转换接口 底层第一套转换接口与实现 (spring提供)
Printer:把其他类型转换为String类型
Parser:把String转为其他类型
Formatter:综合了Printer和Parser的功能
Converter:将任意类型S转换为任意类型T
Printer、Parser、Converter 经过适配转换成 GenericConverter 放入 Converters 集合
FormattingConversionService 利用它们来实现转换
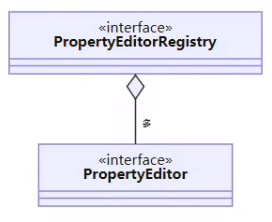
底层第二套转换接口与实现 (jdk提供)
PropertyEditor 把 String 与其它类型相互转换
PropertyEditorRegistry 可以注册多个 PropertyEditor 对象
与第一套接口直接可以通过 FormatterPropertyEditorAdapter 来进行适配
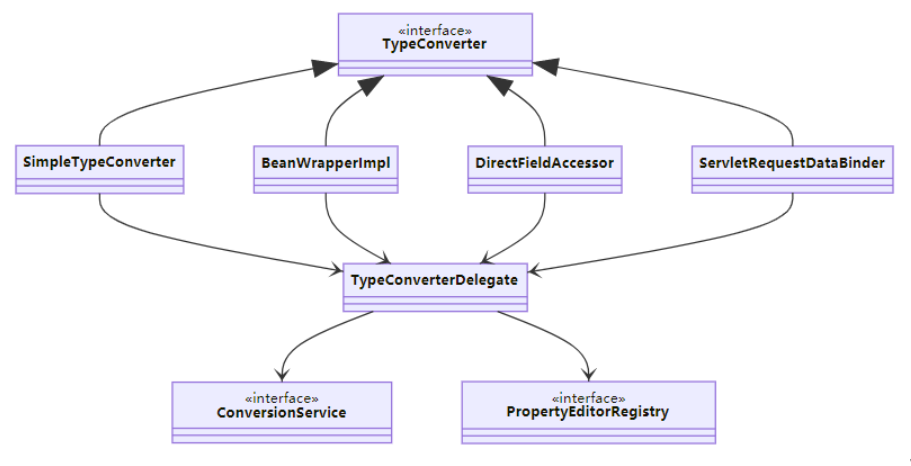
高层转换接口 注意:它们都实现了 TypeConverter 这个高层转换接口,在转换时,会用到 TypeConverter Delegate 委派ConversionService 与 PropertyEditorRegistry 真正执行转换(Facade 门面模式)
1、首先查看是否有自定义的转换器(@InitBinder添加的就属于这种)
2、如果没有则使用 ConversionService 转换
3、如果没有则使用 PropertyEditor 转换
4、最后有一些特殊处理
SimpleTypeConverter :仅做类型转换
BeanWrapperImpl :为 bean 的属性赋值,当需要时做类型转换,走 Property(getter和setter方法)
DirectFieldAccessor :为 bean 的属性赋值,当需要时做类型转换,走 Field(成员变量)
ServletRequestDataBinder :为 bean 的属性执行绑定,当需要时做类型转换,根据 directFieldAccess 选择走 Property 还是 Field,具备校验与获取校验结果功能
演示对象绑定和类型转换 测试SimpleConverter 先创建SimpleTypeConverter对象,然后调用convertIfNecessary方法进行转换
1
2
3
4
5
6
7
8
9
10
11
12
13
14
public static void main (String[] args) { SimpleTypeConverter typeConverter = new SimpleTypeConverter (); Long number = typeConverter.convertIfNecessary("13" , long .class); Date date = typeConverter.convertIfNecessary("1999/03/04" , Date.class); System.out.println(number); System.out.println(date); }
测试BeanWrapper 创建BeanWrapperImpl对象并传入目标对象,调用setPropertyValue传入目标成员变量和转换的值
注意:目标对象中需要有get与set方法,因为BeanWrapper是通过Property赋值
1
2
3
4
5
6
7
8
9
10
11
12
13
14
15
16
17
18
19
20
21
22
23
24
25
26
27
28
29
30
31
32
33
34
35
public static void main (String[] args) { MyBean target = new MyBean (); BeanWrapperImpl wrapper = new BeanWrapperImpl (target); wrapper.setPropertyValue("a" , "10" ); wrapper.setPropertyValue("b" , "hello" ); wrapper.setPropertyValue("c" , "1999/03/04" ); System.out.println(target); } static class MyBean { private int a; private String b; private Date c; public int getA () { return a; } public void setA (int a) { this .a = a; } public String getB () { return b; } public void setB (String b) { this .b = b; } public Date getC () { return c; } public void setC (Date c) { this .c = c; } @Override public String toString () { return "MyBean{" + "a=" + a + ", b='" + b + '\'' + ", c=" + c + '}' ;} }
测试DirectFieldAccessor 创建DirectFieldAccessor对象并传入目标对象,调用setPropertyValue传入目标成员变量和转换的值
注意:此处不需要提供get与set方法,因为DirectFieldAccessor是通过成员变量直接赋值
1
2
3
4
5
6
7
8
9
10
11
12
13
14
15
16
17
18
19
20
21
22
23
24
25
26
public class TestFieldAccessor { public static void main (String[] args) { MyBean target = new MyBean (); DirectFieldAccessor accessor = new DirectFieldAccessor (target); accessor.setPropertyValue("a" ,"10" ); accessor.setPropertyValue("b" ,"hello" ); accessor.setPropertyValue("c" ,"1999/03/04" ); System.out.println(target); } static class MyBean { private int a; private String b; private Date c; @Override public String toString () { return "MyBean{" + "a=" + a + ", b='" + b + '\'' + ", c=" + c + '}' ; } } }
测试DataBinder 注意:DataBinder支持两种方式进行赋值
1、当使用Property方法时,提供get与set方法
2、当直接使用成员变量赋值时,调用initDirectFieldAccess()方法即可,无需提供get与set方法
1
2
3
4
5
6
7
8
9
10
11
12
13
14
15
16
17
18
19
20
21
22
23
24
25
26
27
public static void main (String[] args) { MyBean target = new MyBean (); DataBinder dataBinder = new DataBinder (target); dataBinder.initDirectFieldAccess(); MutablePropertyValues pvs = new MutablePropertyValues (); pvs.add("a" , "10" ); pvs.add("b" , "hello" ); pvs.add("c" , "1999/03/04" ); dataBinder.bind(pvs); System.out.println(target); } static class MyBean { private int a; private String b; private Date c; @Override public String toString () { return "MyBean{" + "a=" + a + ", b='" + b + '\'' + ", c=" + c + '}' ; } }
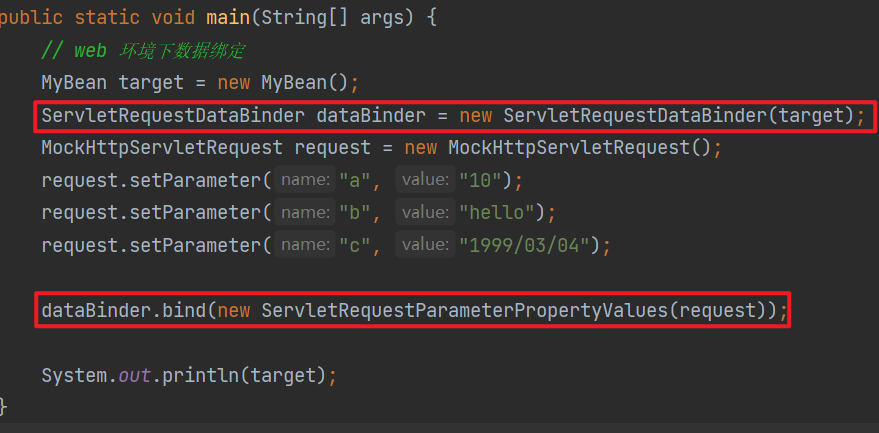
演示web环境下的数据绑定 将DataBinder替换为它的子类ServletRequestDataBinder
替换数据来源,将MutablePropertyValues替换为它的子类ServletRequestParameterPropertyValues
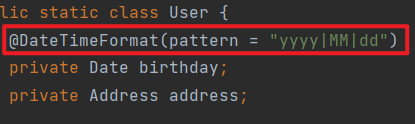
绑定器工厂 问题:如何将存在年月日特殊分隔符的属性进行转换并绑定?
(第二种为嵌套属性,是可以绑定成功的)
使用工厂 无转换功能,绑定失败
User{birthday=null, address=Address{name='西安'}}
1
2
3
4
5
6
7
8
9
10
11
12
13
14
15
16
17
18
19
20
21
22
23
24
25
26
27
28
29
30
31
32
33
34
35
36
37
38
39
40
41
42
43
44
45
46
47
48
49
50
51
52
53
54
55
56
57
58
59
60
61
public static void main (String[] args) throws Exception{ MockHttpServletRequest request = new MockHttpServletRequest (); request.setParameter("birthday" , "1999|01|02" ); request.setParameter("address.name" , "西安" ); User target = new User (); ServletRequestDataBinderFactory factory = new ServletRequestDataBinderFactory (null , null ); WebDataBinder dataBinder = factory.createBinder(new ServletWebRequest (request), target, "user" ); dataBinder.bind(new ServletRequestParameterPropertyValues (request)); System.out.println(target); } public static class User { private Date birthday; private Address address; public Date getBirthday () { return birthday; } public void setBirthday (Date birthday) { this .birthday = birthday; } public Address getAddress () { return address; } public void setAddress (Address address) { this .address = address; } @Override public String toString () { return "User{" + "birthday=" + birthday + ", address=" + address + '}' ; } } public static class Address { private String name; public String getName () { return name; } public void setName (String name) { this .name = name; } @Override public String toString () { return "Address{" + "name='" + name + '\'' + '}' ; } }
使用 @InitBinder 转换 底层使用的是PropertyEditorRegistry和对应的PropertyEditor接口
因为@InitBinder注解需要加在控制器方法上,所以提供一个控制器MyController类,代码如下:
1
2
3
4
5
6
7
static class MyController { @InitBinder public void aaa (WebDataBinder dataBinder) { dataBinder.addCustomFormatter(new MyDateFormatter ("用 @InitBinder 方式扩展" )); } }
同时定义MyDateFormatter日期转换器类,代码如下:
1
2
3
4
5
6
7
8
9
10
11
12
13
14
15
16
17
18
19
20
public class MyDateFormatter implements Formatter <Date> { private static final Logger log = LoggerFactory.getLogger(MyDateFormatter.class); private final String desc; public MyDateFormatter (String desc) { this .desc = desc; } @Override public Date parse (String text, Locale locale) throws ParseException { log.debug(">>>> 进入了:{}" +desc); SimpleDateFormat sdf = new SimpleDateFormat ("yyyy|MM|dd" ); return sdf.parse(text); } @Override public String print (Date date, Locale locale) { SimpleDateFormat sdf = new SimpleDateFormat ("yyyy|MM|dd" ); return sdf.format(date); }
修改原先的使用工厂创建的绑定器,改为@InitBinder 转换
1
2
3
4
5
6
7
8
9
10
11
12
13
14
15
16
17
18
19
20
21
22
23
24
25
26
27
28
29
30
31
32
33
34
35
36
37
38
39
40
41
42
43
44
45
46
47
48
49
50
51
52
53
54
55
56
57
58
59
60
61
62
63
64
65
66
67
public static void main (String[] args) throws Exception { MockHttpServletRequest request = new MockHttpServletRequest (); request.setParameter("birthday" , "1999|01|02" ); request.setParameter("address.name" , "西安" ); User target = new User (); InvocableHandlerMethod method = new InvocableHandlerMethod (new MyController (), MyController.class.getMethod("test" , WebDataBinder.class)); ServletRequestDataBinderFactory factory = new ServletRequestDataBinderFactory (List.of(method), null ); WebDataBinder dataBinder = factory.createBinder(new ServletWebRequest (request), target, "user" ); dataBinder.bind(new ServletRequestParameterPropertyValues (request)); System.out.println(target); } public static class User { @DateTimeFormat(pattern = "yyyy|MM|dd") private Date birthday; private Address address; public Address getAddress () { return address; } public void setAddress (Address address) { this .address = address; } public Date getBirthday () { return birthday; } public void setBirthday (Date birthday) { this .birthday = birthday; } @Override public String toString () { return "User{" + "birthday=" + birthday + ", address=" + address + '}' ; } } public static class Address { private String name; public String getName () { return name; } public void setName (String name) { this .name = name; } @Override public String toString () { return "Address{" + "name='" + name + '\'' + '}' ; } }
使用 ConversionService 转换 底层为 ConversionService Formatter,修改部分
1
2
3
4
5
6
7
8
9
10
11
12
13
14
15
16
17
public static void main (String[] args) throws Exception { MockHttpServletRequest request = new MockHttpServletRequest (); request.setParameter("birthday" , "1999|01|02" ); request.setParameter("address.name" , "西安" ); User target = new User (); FormattingConversionService service = new FormattingConversionService (); service.addFormatter(new MyDateFormatter ("用 ConversionService 方式扩展转换功能" )); ConfigurableWebBindingInitializer initializer = new ConfigurableWebBindingInitializer (); initializer.setConversionService(service); ServletRequestDataBinderFactory factory = new ServletRequestDataBinderFactory (null , initializer); WebDataBinder dataBinder = factory.createBinder(new ServletWebRequest (request), target, "user" ); dataBinder.bind(new ServletRequestParameterPropertyValues (request)); System.out.println(target); }
同时使用 @InitBinder 和 ConversionService 使用@InitBinder扩展的优先级更高
1
2
3
4
5
6
7
8
9
10
11
12
13
14
15
16
17
18
19
20
21
22
23
24
25
26
27
public static void main (String[] args) throws Exception { MockHttpServletRequest request = new MockHttpServletRequest (); request.setParameter("birthday" , "1999|01|02" ); request.setParameter("address.name" , "西安" ); User target = new User (); InvocableHandlerMethod method = new InvocableHandlerMethod (new MyController (), MyController.class.getMethod("test" , WebDataBinder.class)); FormattingConversionService service = new FormattingConversionService (); service.addFormatter(new MyDateFormatter ("用 ConversionService 方式扩展转换功能" )); ConfigurableWebBindingInitializer initializer = new ConfigurableWebBindingInitializer (); initializer.setConversionService(service); ServletRequestDataBinderFactory factory = new ServletRequestDataBinderFactory (List.of(method), initializer); WebDataBinder dataBinder = factory.createBinder(new ServletWebRequest (request), target, "user" ); dataBinder.bind(new ServletRequestParameterPropertyValues (request)); System.out.println(target); } static class MyController { @InitBinder public void test (WebDataBinder dataBinder) { dataBinder.addCustomFormatter(new MyDateFormatter ("用 @InitBinder 方式扩展的" )); } }
默认使用ConversionService 注意:需要添加@DateTimeFormat注解,才能自动添加对应的转换器
1
2
3
4
5
6
7
8
9
10
11
12
13
14
15
16
17
18
public static void main (String[] args) throws Exception { MockHttpServletRequest request = new MockHttpServletRequest (); request.setParameter("birthday" , "1999|01|02" ); request.setParameter("address.name" , "西安" ); User target = new User (); ApplicationConversionService service = new ApplicationConversionService (); ConfigurableWebBindingInitializer initializer = new ConfigurableWebBindingInitializer (); initializer.setConversionService(service); ServletRequestDataBinderFactory factory = new ServletRequestDataBinderFactory (null , initializer); WebDataBinder dataBinder = factory.createBinder(new ServletWebRequest (request), target, "user" ); dataBinder.bind(new ServletRequestParameterPropertyValues (request)); System.out.println(target); }
获取泛型参数 1 2 3 4 5 6 7 8 9 10 11 12 13 14 15 16 17 18 19 20 21 public class TestGenericType { public static void main (String[] args) { Type type = TeacherDao.class.getGenericSuperclass(); System.out.println(type); if (type instanceof ParameterizedType parameterizedType) { System.out.println(parameterizedType.getActualTypeArguments()[0 ]); } Class<?> t = GenericTypeResolver.resolveTypeArgument(TeacherDao.class, BaseDao.class); System.out.println(t); System.out.println(ResolvableType.forClass(TeacherDao.class).getSuperType().getGeneric().resolve()); }
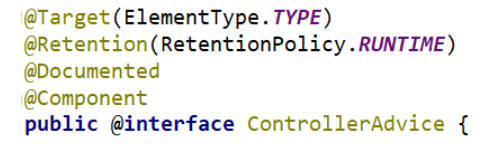
@ControllerAdvice @ControllerAdvice本质上就是一个@Component,可以被当成组件扫描到
初定义拦截规则 ControllerAdvice 提供了多种指定Advice规则的定义方式,默认什么都不写,则是Advice所有Controller,可以通过很多方式来指定规则
对于 String[] value() default {} , 写成@ControllerAdvice("org.my.pkg") 或者 @ControllerAdvice(basePackages="org.my.pkg"),则匹配org.my.pkg包及其子包下的所有Controller
也可以用数组的形式指定,如:@ControllerAdvice(basePackages={"org.my.pkg", "org.my.other.pkg"})
也可以通过指定注解来匹配,如:自定义一个 @CustomAnnotation 注解,匹配所有被这个注解修饰的 Controller, 可以写为 @ControllerAdvice(annotations={CustomAnnotation.class})
功能一:处理全局异常 配合@ExceptionHandler使用
功能二:补充模型数据 配合@ModelAttribute使用
功能三:补充自定义的类型转换器 配合@InitBinder使用
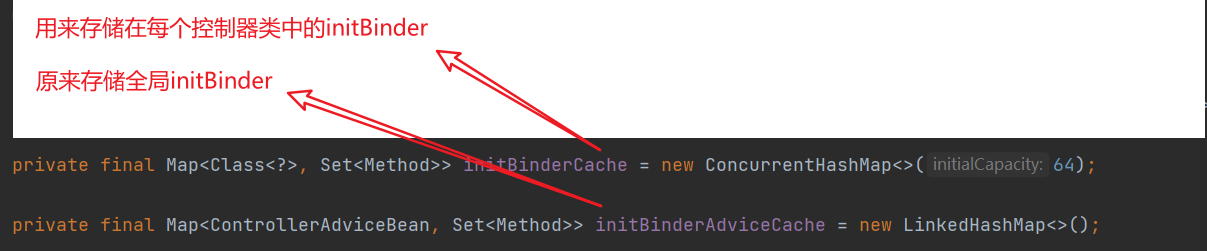
@InitBinder的位置及解析时机 1、@InitBinder注解加在@ControllerAdvice中,对所有的类型转换器都生效,由 RequestMappingHandlerAdapter 在初始化时解析并记录
2、@InitBinderz注解加载某个controller内部的,只针对该控制器生效,由 RequestMappingHandlerAdapter 在控制器方法首次执行时解析并记录
3、以上两种 @InitBinder 的解析结果都会缓存来避免重复解析
4、控制器方法调用时,会综合利用本类的 @InitBinder 方法和 @ControllerAdvice 中的 @InitBinder 方法创建绑定工厂
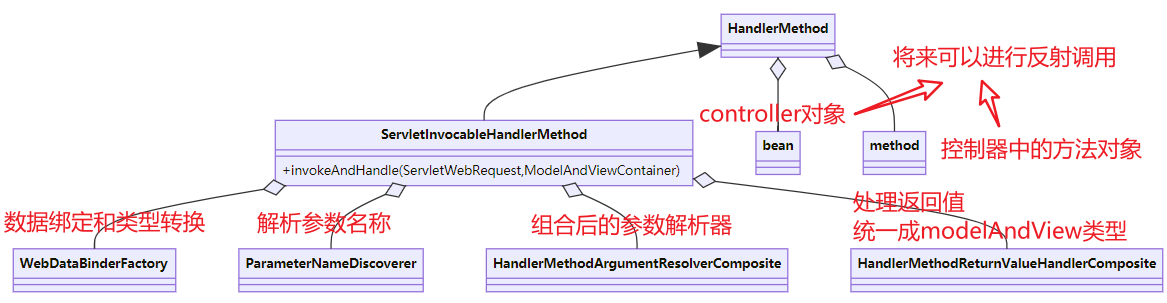
控制器方法执行流程 HandlerMethod
bean:Controller
method:Controller 中的哪个方法
ServletInvocableHandlerMethod
WebDataBinderFactory 负责对象绑定、类型转换
ParameterNameDiscoverer 负责参数名解析
HandlerMethodArgumentResolverComposite 负责解析参数
HandlerMethodReturnValueHandlerComposite 负责处理返回值
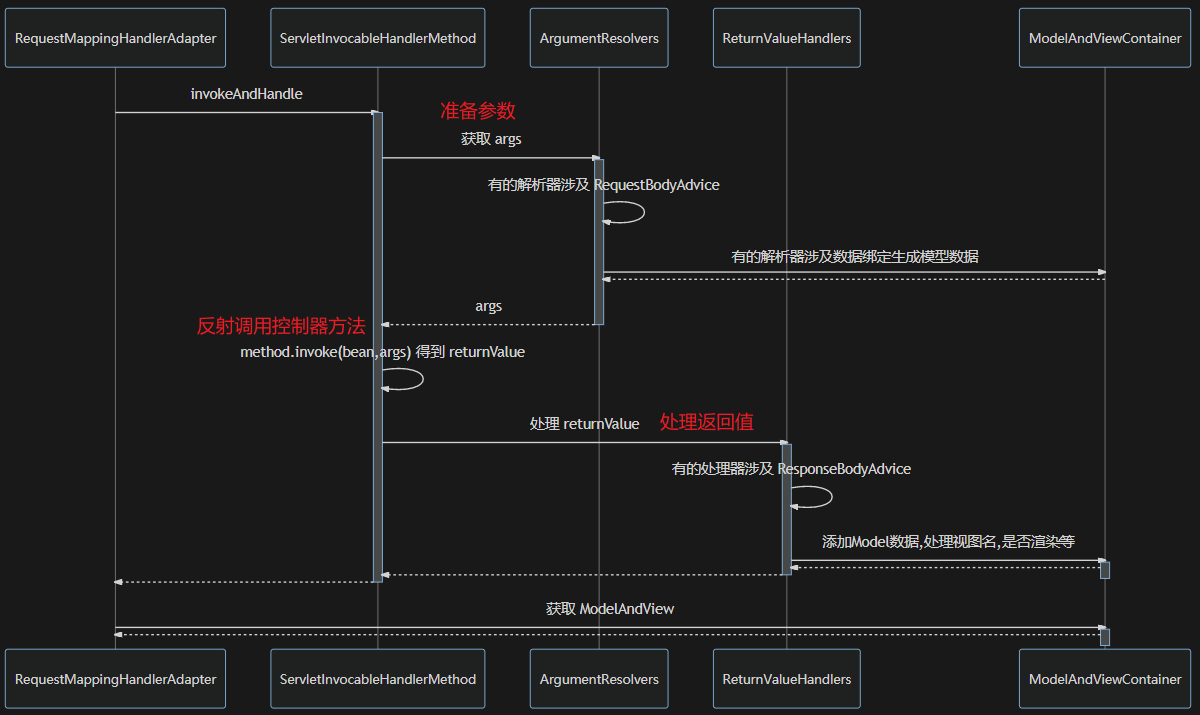
1、RequestMappingHandlerAdapter首先创建WebDataBinderFactory(数据绑定工厂),此时会解析@InitBinder注解,添加一些自定义的类型转换器
2、创建一个ModelFactory(模型工厂:产生模型数据),此时会解析控制器上@ModelAttribute标注的方法,将这个方法的返回值作为模型数据进行添加,添加到ModelAndViewContainer中
3、调用ServletInvocableHandlerMethod,首先执行参数的解析,此时有的解析器可能会涉及到RequestBodyAdvice对请求体进行扩展,有些解析器生成模型数据的也会存入ModelAndViewContainer中
4、获取到参数以后,就可以反射调用,得到returnValue,returnValue交给组合的返回值处理器进行处理,此时有的解析器可能会涉及到RequestBodyAdvice对请求体进行扩展,有些解析器生成模型数据的也会存入ModelAndViewContainer中
5、最后从ModelAndViewContainer,从中找到ModelAndView对象,返回给上层对象
代码演示
准备一个配置类WebConfig,里面创建了一个简单的控制器,加入@ResponseStatus(HttpStatus.OK)是为了可以只关注除了返回值处理器以外的其他组件
1 2 3 4 5 6 7 8 9 10 11 12 13 14 15 16 17 18 19 20 21 22 23 24 25 26 27 28 29 30 31 32 @Configuration public class WebConfig { @ControllerAdvice static class MyControllerAdvice { @ModelAttribute("a") public String aa () { return "aa" ; } } @Controller static class Controller1 { @ResponseStatus(HttpStatus.OK) public ModelAndView foo (User user) { System.out.println("foo" ); return null ; } } static class User { private String name; public String getName () { return name; } public void setName (String name) { this .name = name; } @Override public String toString () { return "User{" + "name='" + name + '\'' + '}' ; } } }