BeanFactory
它是ApplicationContext的父接口
它才是Spring的核心容器,主要的ApplicationContext的实现都组合了它的功能
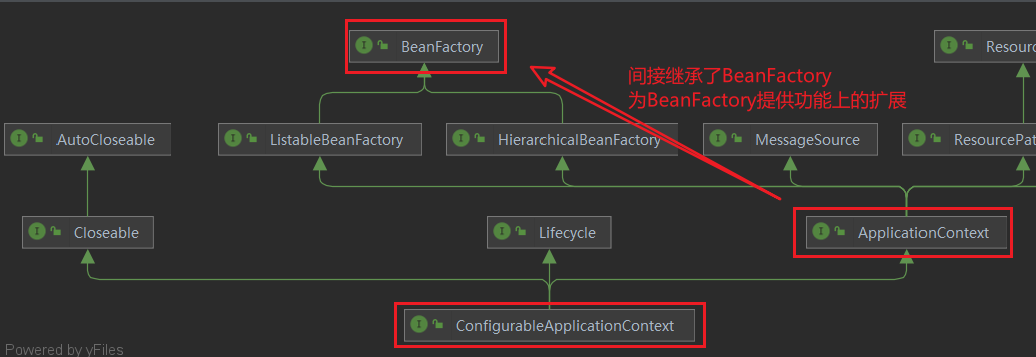
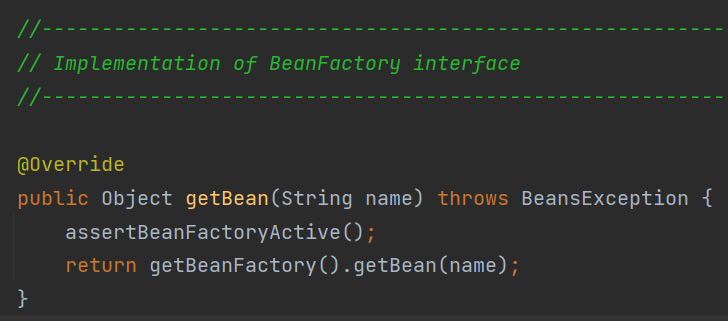
比如使用ApplicationContext的getBean方法,实际上先拿到BeanFactory对象,再去调用BeanFactory的getBean方法
BeanFactory表面上只有getBean功能实际上,控制反转,基本的依赖注入,直至Bean的生命周期都是由它的实现类提供
ApplicationContext功能
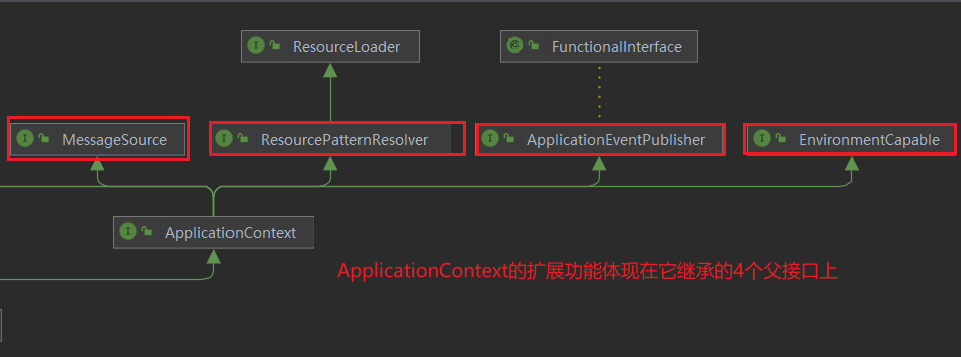
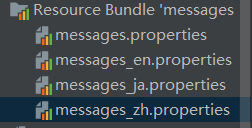
MessageSource:处理国际化资源的能力(翻译) 比如 getMessage方法

RessourcePatternResolver:通配符匹配资源的能力 比如 getResources方法
1
2
3
4
5
6
7
|
Resource[] resources = context.getResources("classpath*:META-INF/spring.factories");
for (Resource resource : resources) {
System.out.println(resource);
}
|
ApplicationEventPublisher:发布事件能力 比如 publishEvent方法
1
2
3
4
5
6
7
8
9
10
11
12
13
14
15
16
17
18
19
20
|
context.getBean(Component1.class).register();
private static final Logger log = LoggerFactory.getLogger(Component1.class);
@Autowired
private ApplicationEventPublisher context;
public void register() {
log.debug("用户注册");
context.publishEvent(new UserRegisteredEvent(this));
}
private static final Logger log = LoggerFactory.getLogger(Component2.class);
@EventListener
public void aaa(UserRegisteredEvent event) {
log.debug("{}", event);
log.debug("发送短信");
}
|
EnvironmentCapable:读取环境信息 比如getProperty方法
1
2
3
|
System.out.println(context.getEnvironment().getProperty("java_home"));
System.out.println(context.getEnvironment().getProperty("server.port"));
|
BeanFactory的实现
给Bean添加定义并进行注册
1
2
3
4
5
6
| DefaultListableBeanFactory beanFactory = new DefaultListableBeanFactory();
AbstractBeanDefinition beanDefinition =
BeanDefinitionBuilder.genericBeanDefinition(Config.class).setScope("singleton").getBeanDefinition();
beanFactory.registerBeanDefinition("config", beanDefinition);
|
添加 BeanFactory 后处理器
1
2
3
4
5
6
7
8
9
10
11
12
13
14
15
16
17
18
19
20
21
22
23
24
25
26
27
28
29
30
31
32
33
34
35
36
37
38
39
40
41
42
43
44
|
AnnotationConfigUtils.registerAnnotationConfigProcessors(beanFactory);
beanFactory.getBeansOfType(BeanFactoryPostProcessor.class).values().forEach(beanFactoryPostProcessor -> {
beanFactoryPostProcessor.postProcessBeanFactory(beanFactory);
});
@Configuration
static class Config {
@Bean
public Bean1 bean1() {return new Bean1();}
@Bean
public Bean2 bean2() {return new Bean2();}
@Bean
public Bean3 bean3() {return new Bean3();}
@Bean
public Bean4 bean4() {return new Bean4();}
}
interface Inter { }
static class Bean3 implements Inter { }
static class Bean4 implements Inter { }
static class Bean1 {
private static final Logger log = LoggerFactory.getLogger(Bean1.class);
public Bean1() {
log.debug("构造 Bean1()");
}
@Autowired
private Bean2 bean2;
public Bean2 getBean2() {return bean2;}
@Autowired
@Resource(name = "bean4")
private Inter bean3;
public Inter getInter() {return bean3;}}
static class Bean2 {
private static final Logger log = LoggerFactory.getLogger(Bean2.class);
public Bean2() {
log.debug("构造 Bean2()");
}
}
|
添加 Bean 后处理器
1
2
3
4
5
|
beanFactory.getBeansOfType(BeanPostProcessor.class).values().stream()
.forEach(beanPostProcessor -> {
beanFactory.addBeanPostProcessor(beanPostProcessor);
});
|
后处理器器顺序
1
2
3
|
System.out.println("Common:" + (Ordered.LOWEST_PRECEDENCE - 3));
System.out.println("Autowired:" + (Ordered.LOWEST_PRECEDENCE - 2));
|
总结
BeanFactory总结:
- 不会主动调用 BeanFactory 后处理器
- 不会主动添加 Bean 后处理器
- 不会主动初始化单例
- 不会解析beanFactory 还不会解析 ${ } 与 #{ }
Bean后处理器会有排序的逻辑
ApplicationContext的实现
ClassPathXmlApplicationContext
在类路径下读取XML配置文件
1
2
3
4
5
6
7
8
9
10
11
12
13
14
| private static void testClassPathXmlApplicationContext() {
ClassPathXmlApplicationContext context =
new ClassPathXmlApplicationContext("a02.xml");
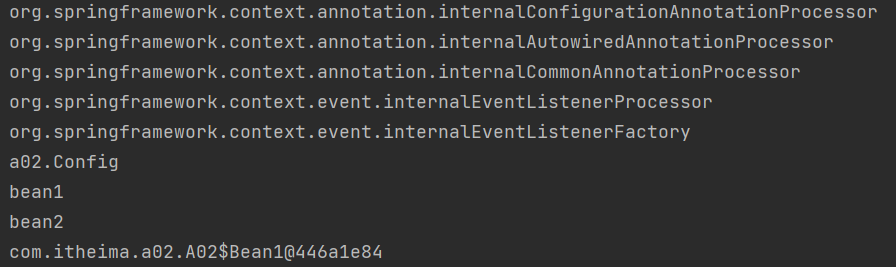
for (String name : context.getBeanDefinitionNames()) {
System.out.println(name);
}
System.out.println(context.getBean(Bean2.class).getBean1());
}
|
1
2
3
4
5
6
7
| //a02.xml
<bean id="bean1" class="com.itheima.a02.A02.Bean1"/>
<bean id="bean2" class="com.itheima.a02.A02.Bean2">
<property name="bean1" ref="bean1"/>
</bean>
|
FileSystemXmlApplicationContext
在磁盘路径下读取XML配置文件
1
2
3
4
| private static void testFileSystemXmlApplicationContext() {
FileSystemXmlApplicationContext context =
new FileSystemXmlApplicationContext("src\\main\\resources\\a02.xml");
}
|
AnnotationConfigApplicationContext
基于java配置类来完成
一种是指定java文件配置类,另一种是指定扫描路径
1
2
3
4
5
6
7
8
9
10
11
12
13
14
15
16
17
18
19
20
21
22
23
24
25
26
| private static void testAnnotationConfigApplicationContext() {
AnnotationConfigApplicationContext context =
new AnnotationConfigApplicationContext(Config.class);
}
@Configuration
static class Config {
@Bean
public Bean1 bean1() {return new Bean1();}
@Bean
public Bean2 bean2(Bean1 bean1) {
Bean2 bean2 = new Bean2();
bean2.setBean1(bean1);
return bean2;
}
}
static class Bean1 { }
static class Bean2 {
private Bean1 bean1;
public void setBean1(Bean1 bean1) {
this.bean1 = bean1;
}
public Bean1 getBean1() {
return bean1;
}
}
|
AnnotationConfigServletWebServerApplicationContext
基于 java 配置类来创建,用于 web 环境
1
2
3
4
5
6
7
| private static void testAnnotationConfigServletWebServerApplicationContext() {
AnnotationConfigServletWebServerApplicationContext context =
new AnnotationConfigServletWebServerApplicationContext(WebConfig.class);
for (String name : context.getBeanDefinitionNames()) {
System.out.println(name);
}
}
|
1
2
3
4
5
6
7
8
9
10
11
12
13
14
15
16
17
18
| @Configuration
static class WebConfig {
@Bean
public ServletWebServerFactory servletWebServerFactory(){return new TomcatServletWebServerFactory();}
@Bean
public DispatcherServlet dispatcherServlet() {return new DispatcherServlet();}
@Bean
public DispatcherServletRegistrationBean registrationBean(DispatcherServlet dispatcherServlet) {
return new DispatcherServletRegistrationBean(dispatcherServlet, "/");
}
@Bean("/hello")
public Controller controller1() {
return (request, response) -> {
response.getWriter().print("hello");
return null;
};
}
}
|
bean生命周期

在各个阶段里都会有由bean后处理器提供的功能增强
bean的后处理器
创建前后的增强
- postProcessBeforeInstantiation
- 这里返回的对象若不为 null 会替换掉原本的 bean,并且仅会走 postProcessAfterInitialization 流程
- postProcessAfterInstantiation
依赖注入前的增强
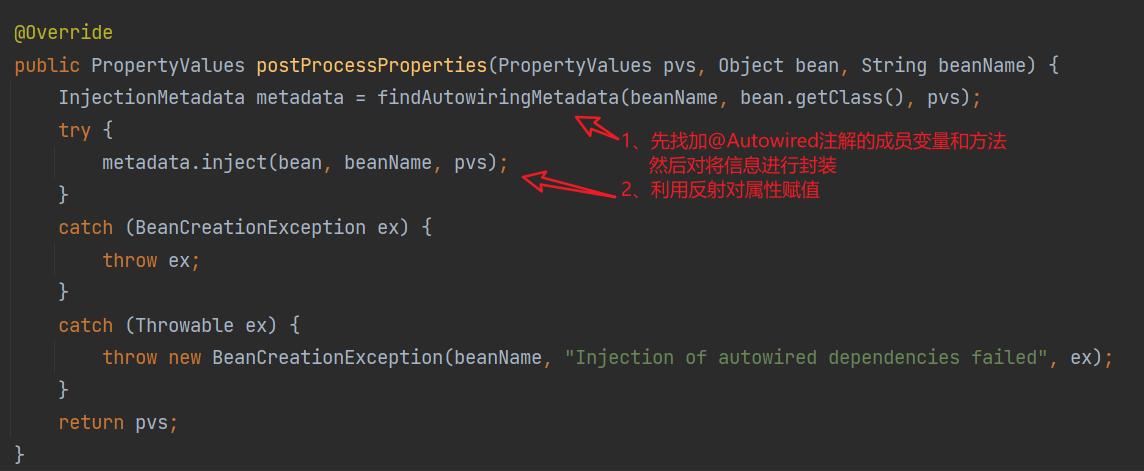
- postProcessProperties
- 如 @Autowired、@Value、@Resource
初始化前后的增强
- postProcessBeforeInitialization
- 这里返回的对象会替换掉原本的 bean
- 如 @PostConstruct、@ConfigurationProperties
- postProcessAfterInitialization
- 这里返回的对象会替换掉原本的 bean
- 如代理增强
销毁之前的增强
- postProcessBeforeDestruction
1
2
3
4
5
6
7
8
9
10
11
12
13
14
15
16
17
18
19
20
21
22
23
24
25
26
27
28
29
30
31
32
33
34
35
36
37
38
39
40
41
42
43
44
45
46
47
48
49
50
51
52
53
| @Component
public class MyBeanPostProcessor implements InstantiationAwareBeanPostProcessor, DestructionAwareBeanPostProcessor {
private static final Logger log = LoggerFactory.getLogger(MyBeanPostProcessor.class);
@Override
public void postProcessBeforeDestruction(Object bean, String beanName) throws BeansException {
if (beanName.equals("lifeCycleBean"))
log.debug("<<<<<< 销毁之前执行, 如 @PreDestroy");
}
@Override
public Object postProcessBeforeInstantiation(Class<?> beanClass, String beanName) throws BeansException {
if (beanName.equals("lifeCycleBean"))
log.debug("<<<<<< 实例化之前执行, 这里返回的对象会替换掉原本的 bean");
return null;
}
@Override
public boolean postProcessAfterInstantiation(Object bean, String beanName) throws BeansException {
if (beanName.equals("lifeCycleBean")) {
log.debug("<<<<<< 实例化之后执行");
}
return true;
}
@Override
public PropertyValues postProcessProperties(PropertyValues pvs, Object bean, String beanName) throws BeansException {
if (beanName.equals("lifeCycleBean"))
log.debug("<<<<<< 依赖注入阶段执行, 如 @Autowired、@Value、@Resource");
return pvs;
}
@Override
public Object postProcessBeforeInitialization(Object bean, String beanName) throws BeansException {
if (beanName.equals("lifeCycleBean"))
log.debug("<<<<<< 初始化之前执行, 这里返回的对象会替换掉原本的 bean, 如 @PostConstruct、@ConfigurationProperties");
return bean;
}
@Override
public Object postProcessAfterInitialization(Object bean, String beanName) throws BeansException {
if (beanName.equals("lifeCycleBean"))
log.debug("<<<<<< 初始化之后执行, 这里返回的对象会替换掉原本的 bean, 如代理增强");
return bean;
}
}
|
模板方法设计模式
1
2
3
4
5
6
7
8
9
10
11
12
13
14
15
16
17
18
19
20
21
22
23
24
25
| public static void main(String[] args) {
MyBeanFactory beanFactory = new MyBeanFactory();
beanFactory.addBeanPostProcessor(bean -> System.out.println("解析 @Autowired"));
beanFactory.addBeanPostProcessor(bean -> System.out.println("解析 @Resource"));
beanFactory.getBean();
}
static class MyBeanFactory {
public Object getBean() {
Object bean = new Object();
System.out.println("构造 " + bean);
System.out.println("依赖注入 " + bean);
for (BeanPostProcessor processor : processors) {
processor.inject(bean);
}
System.out.println("初始化 " + bean);
return bean;
}
private List<BeanPostProcessor> processors = new ArrayList<>();
public void addBeanPostProcessor(BeanPostProcessor processor) {processors.add(processor);}
}
static interface BeanPostProcessor {
public void inject(Object bean);
}
|
Bean后处理器
前言:
1、先创建一个干净容器
1
| GenericApplicationContext context = new GenericApplicationContext();
|
2、用原始形式注入bean
1
2
3
| context.registerBean("bean1", Bean1.class);
context.registerBean("bean2", Bean2.class);
context.registerBean("bean3", Bean3.class);
|
3、利用后处理器进行加载测试
4、初始化容器,并打印
1
2
3
|
context.refresh();
System.out.println(context.getBean(Bean1.class));
|
5、销毁容器
AutowiredAnnotationBeanPostProcessor后处理器
在依赖注入阶段,解析@Autowired和@Value注解
1
2
3
4
5
6
|
context.getDefaultListableBeanFactory()
.setAutowireCandidateResolver(new ContextAnnotationAutowireCandidateResolver());
context.registerBean(AutowiredAnnotationBeanPostProcessor.class);
|
运行过程分析
执行依赖注入的 postProcessProperties 方法
1
2
3
4
5
6
7
8
9
10
11
12
13
14
|
AutowiredAnnotationBeanPostProcessor processor = new AutowiredAnnotationBeanPostProcessor();
processor.setBeanFactory(beanFactory);
Bean1 bean1 = new Bean1();
Method findAutowiringMetadata = AutowiredAnnotationBeanPostProcessor.class.getDeclaredMethod("findAutowiringMetadata", String.class, Class.class, PropertyValues.class);
findAutowiringMetadata.setAccessible(true);
InjectionMetadata metadata = (InjectionMetadata) findAutowiringMetadata.invoke(processor, "bean1", Bean1.class, null);
System.out.println(metadata);
metadata.inject(bean1, "bean1", null);
System.out.println(bean1);
|
1
2
3
4
5
6
7
8
9
10
11
12
13
14
15
16
17
18
19
20
21
22
23
|
Field bean3 = Bean1.class.getDeclaredField("bean3");
DependencyDescriptor dd1 = new DependencyDescriptor(bean3, false);
Object o = beanFactory.doResolveDependency(dd1, null, null, null);
System.out.println(o);
Method setBean2 = Bean1.class.getDeclaredMethod("setBean2", Bean2.class);
DependencyDescriptor dd2 =
new DependencyDescriptor(new MethodParameter(setBean2, 0), true);
Object o1 = beanFactory.doResolveDependency(dd2, null, null, null);
System.out.println(o1);
Method setHome = Bean1.class.getDeclaredMethod("setHome", String.class);
DependencyDescriptor dd3 = new DependencyDescriptor(new MethodParameter(setHome, 0), true);
Object o2 = beanFactory.doResolveDependency(dd3, null, null, null);
System.out.println(o2);
|
总结:
- AutowiredAnnotationBeanPostProcessor.findAutowiringMetadata 用来获取某个 bean 上加了 @Value @Autowired 的成员变量,方法参数的信息,表示为 InjectionMetadata
- InjectionMetadata 可以完成依赖注入
- InjectionMetadata 内部根据成员变量,方法参数封装为 DependencyDescriptor 类型
- 有了 DependencyDescriptor,就可以利用 beanFactory.doResolveDependency 方法进行基于类型的查找
CommonAnnotationBeanPostProcessor后处理器
依赖注入阶段解析@Resource,初始化前解析@PostConstruct,销毁前@PreDestroy注解
1
| context.registerBean(CommonAnnotationBeanPostProcessor.class);
|
ConfigurationPropertiesBindingPostProcessor后处理器
初始化前@ConfigurationProperties
1
| ConfigurationPropertiesBindingPostProcessor.register(context.getDefaultListableBeanFactory());
|
BeanFactory后处理器
ConfigurationClassPostProcessor后处理器
可以用来解析@ComponentScan、@Bean、@Import、@ImportResource注解
1
| context.registerBean(ConfigurationClassPostProcessor.class);
|
解析@MapperScanner注解
1
2
3
| context.registerBean(MapperScannerConfigurer.class, bd -> {
bd.getPropertyValues().add("basePackage", "com.itheima.a05.mapper");
});
|
模拟实现@ComponentScan注解
模拟实现@ComponentScan(点我跳转)
模拟解析Mapper接口
解析Mapper接口(点我跳转)
模拟解析@Bean注解
解析@Bean注解(点我跳转)
Aware接口及InitializingBean 接口
Aware 接口用于注入一些与容器相关信息
1、BeanNameAware:注入 bean 的名字
2、BeanFactoryAware:注入 BeanFactory 容器
3、ApplicationContextAware:注入 ApplicationContext 容器
InitializingBean 接口提供了一种内置的初始化手段
为什么有些功能@Autowired可以实现,还要用Aware接口
- 内置的注入和初始化不受扩展功能的影响,总会被执行
- 而扩展功能受某些情况影响可能会失效
- 因此 Spring 框架内部的类常用内置注入和初始化
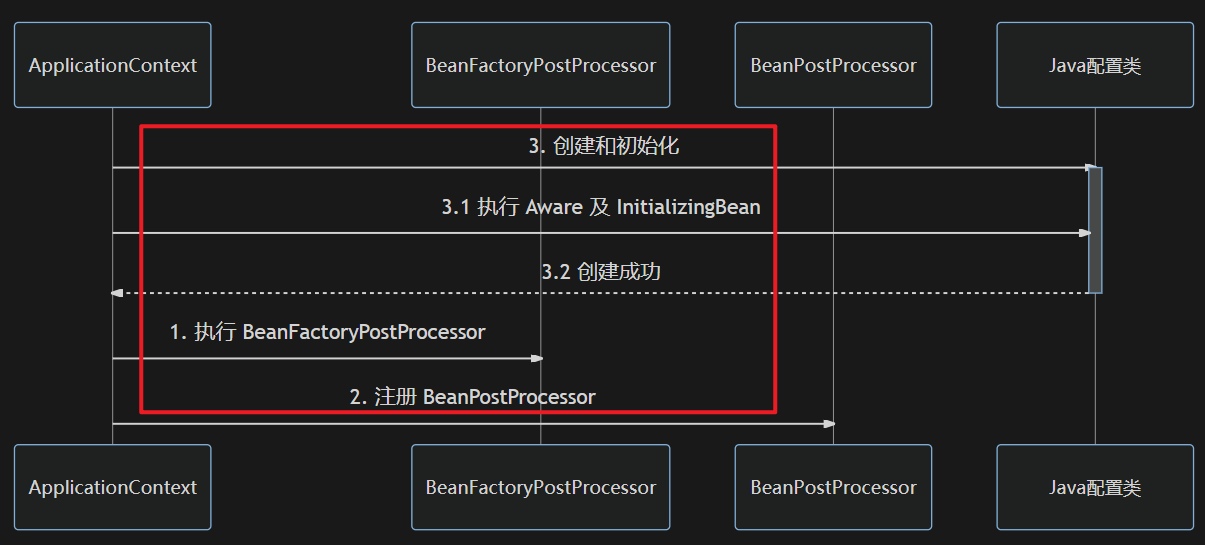
配置类 @Autowired 失效分析
一开始执行beanFactory,而我们配置的beanFactory是通过工厂方法的模式进行配置的,这个方法要进行调用,前提是配置类对象创建了
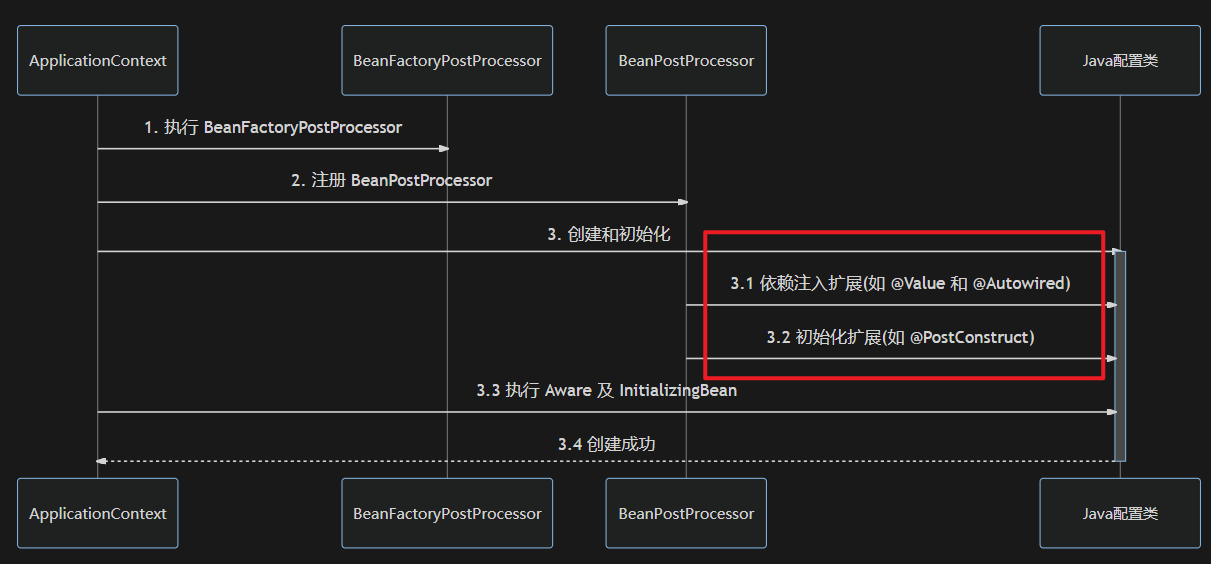
java配置类包含BeanFactoryPostProcessor的情况,因此要创建其中的BeanFactoryPostProcessor必须提前创建Java配置类,而此时BeanPostProcessor还没准备好,也就导致@Autowired等注解失效
1
2
3
4
5
6
7
8
9
10
11
12
13
14
15
16
17
18
19
20
21
22
23
24
25
26
27
28
29
30
31
| @Configuration
public class MyConfig1 {
private static final Logger log = LoggerFactory.getLogger(MyConfig1.class);
@Autowired
public void setApplicationContext(ApplicationContext applicationContext) {
log.debug("注入 ApplicationContext");
}
@PostConstruct
public void init() {
log.debug("初始化");
}
@Bean
public BeanFactoryPostProcessor processor1() {
return beanFactory -> {
log.debug("执行 processor1");
};
}
}
public class test {
private static final Logger log = LoggerFactory.getLogger(test.class);
public static void main(String[] args) {
GenericApplicationContext context = new GenericApplicationContext();
context.registerBean("myConfig1", MyConfig1.class);
context.refresh();
context.close();
}
}
|
Bean的初始化和销毁
Bean的初始化执行顺序
1、@PostConstruct 标注的初始化方法
2、实现InitializingBean 接口的初始化方法
3、@Bean(initMethod) 指定的初始化方法
Bean的销毁执行顺序
1、@PreDestroy 标注的销毁方法
2、DisposableBean 接口的销毁方法
3、@Bean(destroyMethod) 指定的销毁方法
Scope
singleton是容器默认的scope。scope为singleton的时候,在Spring的IoC容器中只存在一个实例,所有对该对象的引用将共享这个实例。该实例从容器启动,并因为第一次被请求而初始化后,将一直存活到容器退出,也就是说,它与IOC容器“几乎”拥有相同的寿命
singleton:容器启动时创建(未设置延迟),容器关闭时销毁
对于那些请求方不能共享的对象实例,应该将其bean定义的scope设置为prototype。这样,每个请求方可以得到自己对应的一个对象实例。通常,声明为prototype的scope的bean定义类型,都是一些有状态的,比如保存每个顾客信息的对象
prototype,每次使用时创建,不会自动销毁,需要调用 DefaultListableBeanFactory.destroyBean(bean) 销毁
在Spring容器中,即XmlWebApplicationContext会为每个HTTP请求创建一个全新的Request-Processor对象供当前请求使用,当请求结束后,该对象实生命周期就结束。
request,每次请求用到此 bean 时创建,请求结束时销毁
Spring容器会为每个独立的session创建属于它们自己全新的UserPreferences对象实例。放到session中的最普遍的信息就是用户登录信息,
session,每个会话用到此 bean 时创建,会话结束时销毁
application,web 容器用到此 bean 时创建,容器停止时销毁
Scope失效分析
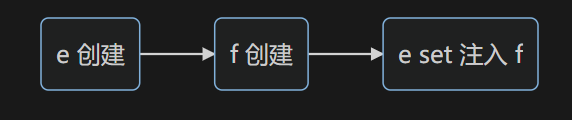
存在一个单例对象E
1
2
3
4
5
6
7
8
9
10
11
12
13
14
| >@Component
>public class E {
>private static final Logger log = LoggerFactory.getLogger(E.class);
>@Autowired
>private F f;
>public E() {log.info("E()");}
>@Autowired
>public void setF(F f) {
this.f = f;
log.info("setF(F f) {}", f.getClass());
>}
>public F getF() {return f;}
>}
|
要注入的对象 F 期望是多例
1
2
3
4
5
6
7
8
9
| >@Component
>@Scope("prototype")
>public class F {
private static final Logger log = LoggerFactory.getLogger(F.class);
public F() {
log.info("F()");
}
>}
|
测试
1
2
3
4
5
| >E e = context.getBean(E.class);
>F f1 = e.getF();
>F f2 = e.getF();
>System.out.println(f1);
>System.out.println(f2);
|
输出
1
2
| >com.itheima.demo.cycle.F@6622fc65
>com.itheima.demo.cycle.F@6622fc65
|
发现它们是同一个对象,而不是期望的多例对象
对于单例对象来讲,依赖注入仅发生了一次,后续再没有用到多例的 F,因此 E 用的始终是第一次依赖注入的 F
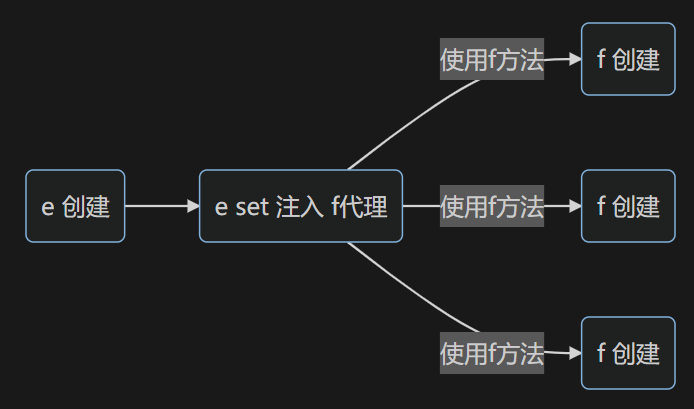
在注入F时,使用 @Lazy 生成代理(代理对象虽然还是同一个但当每次使用代理对象的任意方法时,由代理创建新的 f 对象)
方法一:使用@Lazy代理
1
2
3
| @Lazy
@Autowired
private F f;
|
方法二:在目标类上的Scope注解里添加proxyMode属性proxyMode = ScopedProxyMode.TARGET_CLASS
1
2
3
4
| @Scope(value = "prototype", proxyMode = ScopedProxyMode.TARGET_CLASS)
@Component
public class F2 {
}
|
方法三:在注入时,通过注入一个对象工厂来完成多例的创建
1
2
3
4
5
6
| @Autowired
private ObjectFactory<F> f;
public F getF() {
return f.getObject();
}
|
方法四:在注入时,通过注入ApplicationContext的方式来完成多例的创建
1
2
3
4
5
6
| @Autowired
private ApplicationContext context;
public F getF() {
return context.getBean(F.class);
}
|
方法一和二都是通过反射原理完成多例的创建,性能相比后两种差一点